20 Best Tips

Atomic Cookie Skillet Models

atomic cookie skillet model - hands on way to learn about atoms and the periodic table


One of the things that I want science to be (or any subject) is FUN. If there are opportunities to do something hands-on that will tie in with a lesson and make it ‘stick’ – well, count me in.

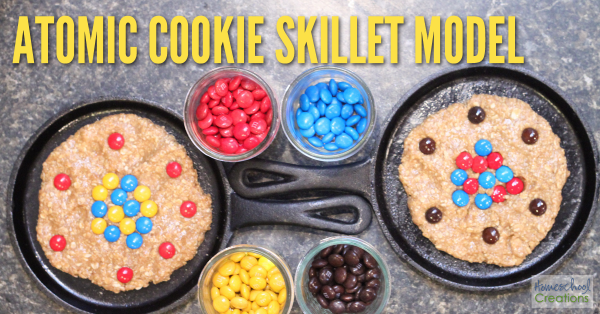
This year our fifth grader is studying Chemistry using Christian Kids Explore Chemistry (aff link). To understand how atoms look, we decided to go the edible route and follow an idea in our lesson on atomic numbers – atomic cookies. We are big proponents of making cookie skillets in our house, so the bigger the atom model, the better!

Note: In an effort to ensure I had enough different colored M&M’s, I may have gone a wee bit overboard at the store trying to find bags of them. If the store would QUIT MOVING the candy, it would also be extremely handy. I ended up with a fall bag, Christmas bag, and a mixed bag, as well as Reese’s Pieces. Just because.

If you’d like to share in the yumminess, you can use the recipe below and make your own as well.

atomic cookie skillet - hands on learning about atoms {%{% Homeschool Creations 2015

Atomic Cookie Skillet Recipe

  • 2 eggs
  • 1/2 cup sugar
  • 1/2 tsp corn syrup or honey
  • 1/4 cup butter
  • 3/4 cup brown sugar
  • 1/2 tsp vanilla
  • 1 tsp baking soda
  • dash of cinnamon
  • 2 1/4 cup rolled oats
  • 3/4 cup peanut butter
  • 7” cast iron skillet (we have this set of 2 aff link)

Preheat oven to 350 degrees. Beat eggs and add remaining ingredients in order listed, mixing well. Place a chunk of the dough into the center of the skillet and press down, leaving some room around the edges for spreading while baking.

atomic cookie skillet - hands on learning about atoms {%{% Homeschool Creations 2015-2

Create a nucleus using the correct number of protons and neutrons. Place them close together in the center of your cookie dough. You’ll have to decide which color you’d like to have representing protons and neutrons. Each atom has a specific atomic number (i.e. oxygen has an atomic number of 8, so there would be 8 protons and 8 neutrons as a part of the nucleus).

atomic cookie skillet - hands on learning about atoms {%{% Homeschool Creations 2015-3

Once your nucleus is in place, choose a different colored M&M to create your electrons and place them along the outer edge of the cookie. Use the same number of electrons as the atomic number (so oxygen would be 8, the same as the protons and neutrons in the nucleus).

atomic cookie skillet - hands on learning about atoms {%{% Homeschool Creations 2015-4

Marvel at the yumminess that will be yours in less than 15 minutes and see if you can identify the different atoms that you created. Bake for 12-15 minutes, or until the cookie is baked to you liking (ours took between 14-15 minutes).

atomic cookie skillet - hands on learning about atoms {%{% Homeschool Creations 2015-5

Enjoy your atomic cookie skillets! Can you guess which atom models we made above? (Hint: count the nucleus or electrons and check your periodic table). And if any of you decide to make an atom representing gold (79), I’d really like to see pictures of that model. Or eat it with you.


Note: You can also  make monster cookies with this recipe. Double the ingredients and add in 1 cup of M&M’s and 1 cup chocolate chips. Use an ice cream scoop to portion on cookie sheet and bake 12-15 minutes.


Building Atom Models

Building atom models is a fun way for children to get a hands-on look at chemistry. Only a few items are needed to create a 3D example of an atom.

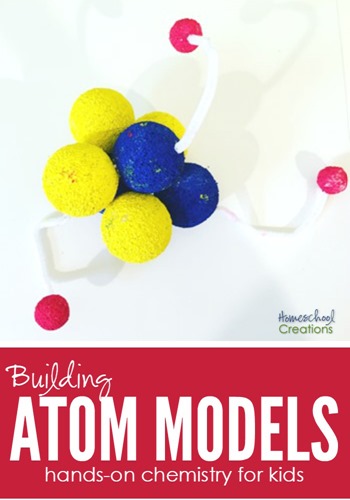
Looking for another hands-on idea for learning about atoms? Building atom models is an easy and memorable way to work on chemistry. 


Atomic cookie model - a fun, hands-on way to learn about atoms and the periodic table

”Homeschooling

EEME Project DIY Display – Review

EEME Project DIY Display review {%{% Homeschool Creations

Zachary has been having far too much fun getting his fingers working on electronic projects from EEME. After working on the Project Genius Light recently, he was more than ready to jump into a new project and see what he could create with circuitry! When that little brown box showed up, it was immediately on his desk and he was ready to start! He is definitely our build and create boy, and any STEM project something he is more than happy to focus on (if only we could bottle that attention for other subjects too – grins).

EEME has been blog sponsor for the last several months and sent us the Project DIY Display (ages 7-12) to work on together. When I say ‘together’ that roughly translates to me observing Zachary as he creates the project himself and explains the different concepts to me. It has been the perfect ‘hands-off’ for me, but opportunity to watch him learn.

Project DIY Display

Project DIY Display from EEME {%{% Homeschool Creations-11

The DIY Display project focuses on segmented LEDs. Remember the scoreboards way back in the day (maybe I’m dating myself talking about our high school scoreboard)? In this project, kids learn how to wire their own switch panel and make numbers display on a mini board. Project build time is approximately 1.5 to 2.5 hours and 38 short lessons or modules.

Project DIY Display from EEME {%{% Homeschool Creations-16

We used the iPad this time to work through the free instructional videos and Zachary took a little over 1.5 hours to complete this project. He’s not one to get up and leave it alone, so once he started, he was on a mission to get it finished and working.

Project DIY Display from EEME {%{% Homeschool Creations-14

Compared to his last EEME project, I was able to sit back this time and observe while Zachary worked. If he had any questions or needed help with something, he just asked. At one point he needed a wire stripped (he may have broken one), so I helped with that and he was back working in just a few minutes.

Project DIY Display from EEME {%{% Homeschool Creations-5

He answered comprehension questions in between the short instructional clips – a huge help to see how much kids are understanding. Some of the questions he answered verbally rather than typing in his longer answers.

Inside an EEME Kit

EEME six project set

Unfortunately Zachary was well into building his kit before I realized that we didn’t have a picture of what came in it this time! However, each of the EEME project kits contains all of the components needed to build the monthly project.

Our first kit (or the first month in the subscription) contained a project kit with all the base pieces need to build that project. Future projects are built using those components as well:  a baseplate, breadboard, and a battery pack. These pieces are reusable. Our kit for the DIY Display included additional components that were necessary to complete this specific project. All curriculum is online and your children can watch and re-watch the videos at anytime.

Projects build in difficulty and are geared for children ages 7-12.  If you have an electronics lover in your home, this is a great monthly subscription plan to teach them more about LED’s, resistors, transistors, capcitors, and much more! If those words are all foreign to you, don’t worry – EEME explains everything in the lessons and you don’t have to be a whiz at electronics for your children to succeed in building and understanding!

If you don’t want to wait for the once a month shipment, you can take advantage of their 6 month project bundle HERE and receive free shipping as well.

How the DIY Display Works

Here’s a quick little peek at our completed Project DIY Display from EEME. It’s a short clip, but shows it in action…

Finished the switch panel from @projecteeme – here’s a quick peek at how it works. Depending on which number is flipped on the switch panel, Zachary can make different numbers light up. This project used the base from our Project Genius activity last month. #projecteeme #Homeschool #hsscience #science

Posted by Homeschool Creations on Tuesday, 15 September 2015

Feed readers can watch the video here.

When each switch is toggled on, there is a closed circuit allowing current to flow from one end of the battery to the other end. When toggled off, the circuit is opened and the segment is turned off (or the current cannot flow). Each of the switches is wired so you can toggle them on and off with other switches to create different numbers.

What You’ll LOVE About EEME

Project DIY Display from EEME  Homeschool Creations

Aside from the fact that all the supplies are included in each of the EEME project kits, the video curriculum is well put together and explain the building process in detail. Each of the videos is between 2 – 10 minutes long. In addition:

  • videos explain the step-by-step process AND the principles involved (how/why something works) – a huge help for parents who don’t know the answers themselves (cough)
  • shorter videos help those with limited attention spans
  • comprehension questions ensure kids are understanding what you are doing
  • videos can be stopped/paused if needed during the process
  • the videos are free to watch – check them out here and get a peek!

We have honestly LOVED these projects from EEME. It has been the perfect fit for Zachary to work on independently. The projects would be wonderful extensions to current curriculum or even as after school learning – or even make a great gift! We’ve learned so much working through two projects already.

There are different purchase options available, including a basic monthly subscription, individual projects, and a 6 month Project Set. They have different purchase options, but we’ve completed the first two projects so far from the basic subscription basic subscription.  You can find more information on the EEME website, or follow them on Facebook, Pinterest, Instagram, or Twitter.

Win a Project Light Link from EEME

Project Light Link from EEME giveaway {%{% Homeschool Creations

EEME has offered Project Light Link as a giveaway to THREE of my readers! Project Light Link is the best way to get acquainted with EEME’s hands-on building and learning experience. This giveaway is open to US readers only and will be open through Wednesday, October 14th at midnight. Use the Rafflecopter widget below to enter!

a Rafflecopter giveaway


But I’d love to know – what age is the child you would like to use EEME with and learn about electronics? Leave a comment below!

EEME Project Genius Light Review

Helping our kids have a deep understanding of what the science, technological, electronics, and math (STEM) principals are behind various technology is so important in life! If you are one that isn’t familiar with circuitry, but have a child who is – read on, because your children will LOVE the projects and lessons we’ve been covering recently.

Project Genius Light Review from EEME

Zachary is our hands-on, loves to learn about electronics kid. He is constantly trying to figure out how things work, sometimes to the detriment of things in our household. Note: That doesn’t mean I’m always happy when he tries to ‘fix, aka mangle’ something.

The Project Genius Light from EEME

EEME offered us the chance to work on the Project Genius Light (for kids ages 7-12), an LED circuit board that teaches kids about electronics in a meaningful and engaging way. Can you guess who was excited about helping out? From the moment the box arrived in our house, Zachary was ready to start.

Here’s a look at the Genius Light project:

With the Genius Light project, you will assemble a simple LED circuit system that does the smart thing – lights up when it is dark and dims when it is light. (30 lessons)

Your family will learn about:
– LED light bulbs
– Resistors
– Photoresistors
– Breadboards
– Project build time: 1.5 – 2.5 hours

Project Genius Light from EEME-4

I’ll be honest and tell you – I was a little hesitant on pulling it out for Zachary though and put it off to the side for a bit because I didn’t want him to get started and then forget about it or get distracted. But then I forgot and the box got pushed aside until he found it and held the box in front of me every day until I opened up the laptop to have him watch the free instructional videos and let him work on the project.

Project Genius Light from EEME-18

Although he wanted to work on it by himself, I hung around in case he needed any help. Sometimes he can get ahead of himself and want to do the lessons out of order. For the most part, I tried to stay out of what he was doing and he quickly figured out that the lessons are in an order for a reason. As he began going through the lessons and tried to skip ahead, he went back and picked up where he should have followed along.

Project Genius Light from EEME-21

In between the short video clips on the projects, there were comprehension questions to answer so I was able to see how much Zachary was understanding. Rather than having him try to type in the longer answers, he gave me an oral answer (we were watching via the iPad and it was much harder to type answers on for him).


RSS Feed subscribers can click here to watch the video

Overall, the videos, lessons, and building took us a little over an hour to complete (allotted time is 1.5 to 2.5 hours). Above is a video clip of Zachary explaining one of the circuits he built and why/how it worked. I may have learned a few new terms and things about circuits in the process!

What is in an EEME project kit?

Each of the EEME project kits contains all of the components needed to build the monthly project. The first month you receive a project kit with all of the base pieces you will need to build future projects on, including a baseplate, breadboard, and a battery pack. These pieces are reusable. All curriculum is online and your children can watch and re-watch the videos at anytime.

Projects build in difficulty and on what children are learning and are geared for children ages 7-12. And psst – they have a 100% satisfaction guarantee. If you have an electronics lover in your home, this is a great monthly subscription plan to teach them more about LED’s, resistors, transistors, capcitors, and much more! If those words are all foreign to you, don’t worry – they explain everything and you may learn a thing or two before your child is done.

EEME six project set

If you don’t want to wait for the once a month shipment, you can take advantage of their 6 month project bundle HERE and receive free shipping as well.

What I Love About EEME

The videos from the EEME project kits are well put together and explain the building process well. Each of the videos is between 2 – 10 minutes long. In addition:

  • videos explain the step-by-step process AND the principles involved (how/why something works)
  • the shorter videos help those with limited attention spans
  • comprehension questions ensure kids are understanding what you are doing
  • you can stop/pause a project if needed during the process
  • the videos are free to watch – you can check them out here
  • if the words LED, resistor, transistor, and capcitor are foreign to you, don’t worry – they do all the teaching!


    Try a FREE Project from EEME.co

FREE LED Light Circuit Offer from EEME

EEME has a FREE LED light circuit introductory offer for readers of Homeschool Creations. Build an LED light circuit and learn how it works with Project Light Link and the online curriculum. The project comes with everything you need to start building – batteries, wires, etc… This is normally $14.95, and all you have to pay is s/h for the project. Click HERE to get your FREE kit from EEME.

Win a Project Genius Light from EEME

2015_07_27__genius_light (1)

EEME has offered a Project Genius Light as a giveaway to one of my readers (a $49.95 value)! This giveaway is open to US readers only and will be open through Wednesday, August 12th at midnight. EEME is hosting this giveaway, so click below to enter!

But I’d love to know – what age is the child you would like to use EEME with and learn about electronics? Leave a comment below!

Homeschool Creations: EEME Project Genius Light Giveaway

Animal Babies Matching Activity – Free Printable

Names-of-Baby-Animals-500x500-3


To celebrate Mother’s Day, All About Learning Press has a special downloadable reading activity: Baby Animal Names Matching!  This simple learning activity includes a few animals that you won’t see in a typical matching game, including a raccoon and a kangaroo. Just match the animal babies with their mommas!

Additional FREE Reading and Spelling Activities

If you’re looking for a few other reading and spelling activities to use with your children, be sure to check out these fun games too. They are ones that we’ve used with our kids over the years and love!

Be a Lumberjack syllable game

Be a Lumberjack – works on dividing multisyllable words

 three letter blend game

Word Flippers – works on common three letter blends (str, spl, scr, and spr)


ee blend words

Wake Up the Sheep – works on reading words with the ‘ee’ blend


feed the anteater game

Feed the Anteater – a fun game for kids to make the anteater ‘eat’ the word ants


Win a Level of All About Spelling!

image

Be sure to enter to win a full level of spelling from All About Spelling too! Each month, there is a wonderful giveaway and this month is no different! Our family has loved this hands-on spelling program and we have used it for years now. It was the first curriculum that really clicked with us and we haven’t looked back. Read our review of All About Spelling here.

Simple Math Tip to Keep Numbers Straight

Do your kids have trouble keeping their numbers straight and make simple calculation errors because they shift numbers into the wrong columns?

Simple Math Tip to Keep Numbers Straight

A few of our kids have had trouble keeping their math figures ‘neat’. And by neat I mean there were calculation errors because numbers were getting shifted over and then added or subtracted incorrectly.

Frustrations mounted because the errors, but the kids couldn’t seem to keep things lined up properly, so we grabbed something fairly simple to help out – a sheet of graph paper.

Graph Paper-1

Each box gives them enough room to put a number in  and helps them get everything lined in columns  properly. For our oldest (who just started Algebra 1), it will also be handy for graphing.

Graph Paper-1-2

I can honestly say using graph paper for math has been one of the easiest things we’ve done to help out, and all it required was a pack of paper. That is a win-win for me (and the kids)!

Another Quick Tip for You

Sticker dots for reading

If your kids are feeling overwhelmed with reading, find out how two simple sticker dots helped us out!

Science Learning Ideas – Preschool and Kindergarten Community

Homeschool Preschool: Preschool and Kindergarten Community linkup at Homeschool Creations

Hands-on science makes learning SO much more fun for kids (and moms and dads too!). This year we’re hoping to fit in at least one fun experiment each week. If you’re looking for a few ideas to do with your kids, try some of these…

science water fountain color exploration

Explore color mixing and create a water fountain with this tutorial from A Little Pinch of Perfect.

Create a learning center to explore the life cycle of a frog. Stir the Wonder shares their science table and hands-on learning ideas.

Reinforcing-Science-Concepts_thumb

Kids learn best through repetition and Planet Smarty Pants shares some ways to reinforce science concepts with our kids with practical application and simple questions we can ask to continue learning.

science baking soda science

Glitter and ice cubes were two major ingredients in some toddler science activities that Welcome to Mommyhood shared – and then the kiddos got busy adding and trying even more!

Have a fun science activity to share? Be sure to link up your learning fun this week!

Follow the PreK and Kindergarten Community Pinterest Board

Preschool Pinterest Board

Each week I am  pinning many of your links onto the Preschool and Kindergarten Community Pinterest Board. I’m a visual person, so having pictures to help me remember posts is super helpful. Be sure to jump over and follow the board – and find some fun ideas at the same time!

Were You Featured in the Preschool & Kindergarten Community?

If you were featured in one of the weekly posts, feel free to grab the button coding below and display it on your site!

Homeschool Preschool


Link Up with the Preschool and Kindergarten Community!

Share what you are doing with your kids! Please link your exact blog post to the Mr. Linky below and link back here too! Grab a button for your post and be sure to take a minute to visit the person who linked up before you.