20 Best Tips

Homeschool Science Curriculum Sale – Save 15%

cke-sale

One of the programs that we’ve been using this year with our fifth grader, Zachary, is Christian Kids Explore Chemistry from Bright Ideas Press (aff link). He has been loving the hands-on projects that tie in with the program and learning so much about chemistry as we work through our text.

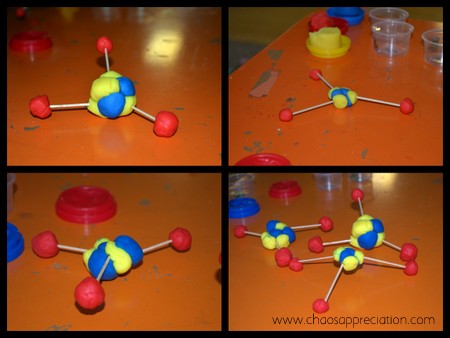
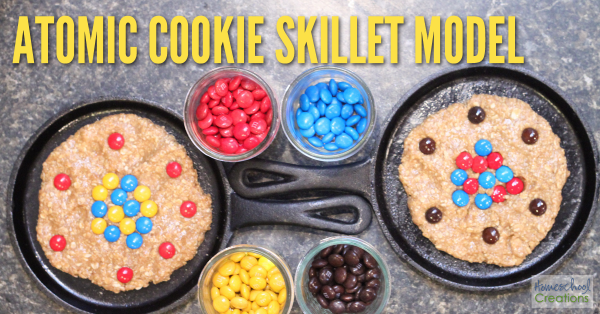
We work through one chapter a week: reading, review, and a hands-on project and it is just the right balance of independent work and learning. Our atomic cookie skillet model and atom models were both a part of our hands-on learning.

Save 15% on Christian Kids Explore series

Right now you can save 15% on the Christian Kids Explore books (aff link) – from Biology, Physics, Earth & Space, and Chemistry and beyond. No code needed as the prices all currently reflect the sale prices.

Both Biology and Earth & Space were written for students in grades 3-6, but the simplicity of the activities and clearness of teaching makes them easily adaptable for younger students as well. Every activity was designed using inexpensive and easily accessible resources. The book is laid out so the reading, worksheets, coloring pages, vocabulary, activity instructions and more all come in one book. This makes for a format that also works very well with co-ops.

The Chemistry, Physics, and Creation Science books were written for grades 4-8. These books can be adapted to fit third grade students, but because they are advanced enough to set a foundation for high school studies, you may wish to start with the Biology or Earth & Space editions with any student younger than fourth grade.

Learn more about Christian Kids Explore Science HERE.

Building Atom Models – Hands on Chemistry for Kids

building atom models with kids copy

One of the things that I’ve loved about our Chemistry science program (aff link) for Zachary this year is the hands-on aspect of the program. He is a boy that needs a little something to do with his hands every now and then, so it has fit in very well for us. As we’ve been learning about atoms together the last several weeks,  Building atom models and getting a 3D look at how an atom might actually appear has been a great way to visualize what we’re talking about. Quite obviously, these models are not to scale and a whole lot larger than the real thing. (grins)

In our model we used Styrofoam balls to represent the protons, neutrons, and electrons. In an atom, the protons and neutrons are in the nucleus (the center of the atom), and the electrons surround the atom. In diagrams you often see the electrons represented by elliptical lines moving around the nucleus.

3D lithium atom model project for kids

Building Atom Models

We chose to build a model of a lithium atom and used the following supplies. If you would like to make a different atom, the number of styrofoam balls will differ based on the number of neutrons, protons, and electrons in the atom. See below for how to calculate those numbers.

  • 7 styrofoam balls – we used ones that were about 2” in diameter
  • 3 styrofoam balls about 1 inch in diameter
  • 3 pipecleaners
  • toothpicks
  • red, yellow, and blue paint
  • paintbrushes
  1. Paint four of the 2” balls yellow (neutrons) and three of the balls blue (protons).
  2. Paint the 1” balls red (electrons).
  3. Using the toothpicks, connect the yellow and blue balls together, making sure they touch each other. We broke out toothpicks in half so they wouldn’t poke through too much.
  4. Connect each electron (red balls) to one of the protons (blue balls) using the pipe cleaners.

The model was a great way for us to understand a little better how atoms look. It was fun to talk about how many balls we would need to make some of the other atoms such as gold (79 protons/electrons and 118 neutrons – that would be a very large model!). We definitely figured it would be easier to stick to some of the more smaller numbered atoms on the periodic table!

To Build Different Atom Models

If you are trying to figure out how many neutrons, protons, and electrons an atom has, there is a way to work it out without needing to look up each atom one at a time. Each atom has an atomic number and an atomic weight. The atomic number tells you how many protons and electrons that atom contains. The neutrons are determined by looking at the atomic weight of the atom, rounding it up to the nearest whole number, and subtracting the number of protons. Usually you can find both numbers on your periodic table of elements.

Atomic weight = Protons (atomic number) + Neutrons


Additional Atom Model Ideas

Don’t care for styrofoam balls? Check out this idea on the Bright Idea Press blog using playdough (secretly I almost wish I would have seen this version first). Zachary loved creating and painting the model we did though, but I’m filing away this idea to use another time!

A few weeks ago we made edible atom models – and we enjoyed every single bite! Check out our atomic cookie skillet models for the recipe and instructions.

If you’d like to learn more about the homeschool chemistry program we are using, you can find out more here. Feel free to check out the rest of our homeschool curriculum choices as well!

Polar Bear Pack – Limited Time Freebie!

Polar Bear Reading and Spelling Pack

Just in time for some winter fun, All About Learning Press is offering a limited time freebie for reading and spelling practice – the Polar Bear Pack! This full-color pack contains 30 printable pages of delightful reading and spelling activities that are positively popping with polar bears. Included in the pack you will find:

  • Polar Bear ABCs – practice letter knowledge, handwriting, and letter sounds with some help from these cheerful polar bears! Perfect for preschoolers!
  • Rhyming Polar Bears – Match up the pairs of rhyming polar bears and build important reading skills.
  • Polar Bear Word Searches – Word search puzzles are a great way to practice reading and spelling skills, as well as a great way for children to have fun with words. Great for all ages!
  • Arctic Animal Fun Facts – Polar bears live in the far north, but many other birds and animals live in the Arctic region as well. Explore sixteen different Arctic inhabitants in this fun fact booklet.
  • Polar Bear Breakfast – A fun polar bear breakfast treat to enjoy on a wintry morning.
  • Polar Bear Library List – A list of books you need to check out at your local library!

All of the activities included in the Polar Bear Pack correlate with All About Reading and All About Spelling and will give you a fun peek into the quality of their products. If you aren’t using either of those programs, don’t worry – they will easily go along with any curriculum you are using and will be a fun addition.

free polar bear printable pack

Grab the FREE Polar Bear Pack HERE!

      See Why We LOVE All About Learning Press!

    Curious about All About Reading and All About Spelling? Our family has been using both programs for years and we highly recommend them. Get a peek into some of their different programs and how they’ve worked with our children in the following posts:

    Rock Hound’s Backpack – Exploring Rocks with Kids

    Rock Hounds Backpack Kit - exploring and learning about rocks with kids copy


    Getting our kids outdoors and exploring the world surrounding them is something we definitely want to encourage. When we take nature walks we might often pick up leaves or talk about the different trees, animals, or bugs we see along the way, but rocks aren’t typically something we do a lot of research on. We have picked up ones that look interesting, but usually that’s where it ends.

    Home Science Tools - Rock Hound's Backpack

    The last few weeks though, we’ve had a little boy intrigued by rocks in our midst! Kaleb received the Rock Hound’s Backpack Kit from Home Science Tools – full of everything he needed to start a rock hunting exploration – and was quickly out the door on a search for some different rocks.

    Inside the Rock Hound’s Backpack Kit

    KT-YROCKS

    The Rock Hound’s Backpack Kit is ready to use within minutes of opening up your box. There are so many pockets and storage places in the backpack – plenty of room for a growing rock collection! Included in the kit are all of the items you see pictured above (and listed below).

    • Nature Backpack – store all of your tools and collection in this comfortable and compact pack. Padded shoulder straps and back.
    • Rock Pick – This heavy-duty steel rock pick has a hammer on one end and a pointed pick on the other for chiseling off specimens.
    • Safety Goggles – protect kids’ eyes while using the rock pick.
    • Rock and Mineral Test Kit –  instructions and materials to test for properties such as color, hardness, acidity, and magnetism. Includes a 5x/10x double-lens magnifier.
    • Mineral Hardness Scale Set – set of nine Mohs Scale of Hardness minerals lets kids test the hardness of their specimens and see how soft or hard rocks can be.
    • Crack-Open Geode – a fun specimen for kids to open using the rock pick and discover the crystals or mineral deposits inside!
    • Nature Notebook – A small notebook with blank pages that is great for keeping notes, recording test results, and making drawings of rocks and minerals that are too large to collect.
    • Rocks and Minerals Golden Guide – With full-color illustrations and easy-to-read text, anyone can use this guide to learn about and identify common rocks and minerals.
    • Rock and Mineral Display Box – a box with 15 compartments to store or display a growing rock and mineral collection.
    • Specimen Collection Bags – 15 plastic bags of varying sizes for collecting and sorting rock samples on the go (and keeping the backpack clean!).
    • Instructions –  information about the Mohs hardness scale, plus tips on collecting, identifying, and labeling rocks and minerals.

    Exploring and Learning About Rocks

    collecting rocks to examine

    The first step in our rock exploration was finding different rocks. Kaleb went on a little adventure with his Rock Hound Backpack and decided to take a nature walk in the woods around our house, returning with these three rock samples. He thought they looked cool (grins).

    exploring rocks with kids

    We dropped the rocks into one of our collection bags and later pulled them out one by one to examine them. The Rock Hound Backpack includes a collapsible hand lens. Before doing any other tests on the rocks, we made observations about each of the rocks gathered.

    exploring rocks with kids-2

    One of our favorite things included in the kit are the nature notebook and Rocks and Mineral guidebook. The notebook is a simple sketchbook, but has plenty of room to take notes, draw pictures, and keep records of all we are observing and discovering. The guidebook is full of wonderful pictures and tips for learning about rocks (a definitely keeper for the bookshelf too!)

    Kaleb drew a picture of each of the rocks collected and took notes on them as well, making notes about their color, luster, if they were opaque or translucent, etc… and left room for some additional notes. This is one thing that I loved watching. It’s funny how writing can be such a chore in some instances, but when a subject of interest comes along, writing suddenly becomes something enjoyable – and even attempting to spell and sound out words isn’t as painful.

    exploring rocks with kids-3

    Our next step was testing the hardness of each rock gathered. The kit included a set of nine Mohs Scale of Hardness minerals, so one by one the minerals were pulled out, scratched against each other and the final hardness of the specimen was recorded in our notebook.

    exploring rocks with kids-4

    Kaleb’s favorite part of everything was definitely using the rock pick! (I know, shocking, right?) With safety goggles on, we took the rocks outside and cracked them all open.

    exploring rocks with kids-5

    Some of our rocks broke open a little more easily than others and allowed us a chance to see the different variations and texture in the rock, other than just the external part of the rock.

    exploring rocks with kids-6

    We traveled recently and grabbed our Rock Hound’s backpack to take along with us to a swim meet. I knew we would have a block of time during the afternoon where we wouldn’t have anything to do, and this was a perfect activity to get us outside and working on something hands-on. What you don’t see in this picture are the other children that gathered around us to watch what we were doing. Everyone was chiming in about different rocks, what they observed – it was so much fun!

    We also tested the magnetism of the rocks once we cracked them open (none of ours had any magnetic properties),

    exploring rocks with kids-8

    The small white rock was definitely the favorite rock to examine and break apart and has been made it’s way into the collection box to save. Not that all rocks aren’t special, but this one was the prettiest and most interesting to him.

    Having specimen bags and everything handy to test and examine the bags was a huge help. We still need to run an acidity test on each of our rocks and the fun this week will be narrowing down even further what type of rocks and minerals we collected. We are taking our time on this step, mainly because we have been distracted going through the Rocks, Gems, and Minerals book – too many fun facts and pictures!

    The convenience of having everything in one backpack, easy to grab and take along on a nature hike makes this a perfect addition to our homeschool learning! We already have a special spot in our schoolroom where our Rock Hound’s backpack is hanging as a reminder to use it often! Our kids would definitely recommend it as well – and several other kiddos are anxiously waiting their turn.


    Nativity Pocket Chart Calendar Cards – Free Printable

    Nativity Pocket Chart Calendar Cards

    Hopefully you all are enjoying a little break at some point this upcoming week with Thanksgiving {well, at least those of you in the US!}. December isn’t that far away, so here’s a head start for you to print and laminate before the month of December begins.

    A reader emailed and asked if I would be willing to create Nativity Pocket Chart Calendar Cards. While she loved the free December pocket chart calendar cards I shared several years ago, she wanted one featuring Mary, Joseph, and baby Jesus – and I absolutely wanted to help her out.


    How to Use the Nativity Pocket Chart Calendar Cards

    Use the different colored number cards to try different pattern sequences: an ABC pattern, ABAB pattern, AABB pattern and other patterns you can make up together. Here’s an example of different patterns using the cards from September.

    pattern example

    The set also includes a calendar header for the month of December as well.

    Nativity Pocket Chart Calendar Header

    Additional Calendar Helps

    Here are a few additional printables and helps for you all, including the pocket chart that we use, laminating tips, and additional printables you may like:

    Yearly pocket chart calendar numbers from Homeschool Creations copy Pocket chart holiday and special occasion cards


    Additional December Pocket Chart Calendar Pieces

    Pocket Chart Calendar Cards for the month of December

    If you’d prefer a different set of Christmas themed calendar pocket chart calendar pieces, feel free to grab a free set here.

    PDF Printing Problems

    Having trouble downloading or printing this file? Be sure to check out the post on PDF Download Problems for tips and tricks on getting the files to download properly. The solution is usually something simple and quick!

    EEME Project Amp Review

    Project Amp from EEME - build a working amplifier and learn how it works  Homeschool Creations copy

    One of the best motivators for our 11 year old to get his schoolwork done the last few weeks has been the promise of working on his latest EEME assignment: Project Amp. He is a boy who loves listening music, learning about electronics, and enjoys building, so this project was PERFECT for him. 

    We’ve worked on several smaller projects from EEME in the last few months, and Zachary honestly cannot get enough of them. The hands-on aspect and opportunity to get a behind-the-scenes look at how electronics really work (and understand the process) has been worth every moment spent on the projects.  Both he and I have learned so much about

    When EEME released a larger electronic project and asked if we would be willing to try it out, the answer was a resounding yes – especially when Zachary found out he would have a full-sized speaker amplifier that he could hook his iPod shuffle up to and play his favorite music nice and loud! We absolutely love

    What is Project Amp?

    Project Amp-51

    Project Amp would be a perfect gift for children 10 and up! When fully completed, your child can plug their mp3 or iDevice into the amp and play his favorite music. It is a full speaker amplifier system that is 12.5" x 6.5" x 6.5" – and it can be LOUD if certain children decide they would like it to be (don’t worry moms, there is a volume control knob!).

    Project Amp-8

    Everything your child needs to build the amp is included in the box – from wire strippers down to every last nut, bolt, and wire needed from start to finish. The lessons are all online video-based, so your child will need to have access to internet to follow along with the lessons.

    There are 55 short lessons to watch on the EEME website in which your child will work through the building process for the amp and learn about:

    • amplifiers
    • how sound waves work
    • direct current vs. alternating current
    • capacitors as sound filters

    The build time for this project is between 4-6 hours, depending on your child’s ability and focus. Recommended for children ages 10+.

    Our Thoughts on Building Project Amp

    Project Amp-47

    Zachary is completely thrilled with his finished amp. It has been continuously playing music (perhaps loudly) since its completion and has been proudly toted around to show his friends what he made. For real – the above picture made us laugh out loud because it was his real reaction when he had everything hooked up and was ready to put the rear panel onto the back of the amplifier. He had tested it at various stages during the building process, but hearing and seeing it all at the same time was so much more fun!

    Project Amp-7

    The overall building time and process on this project was a little more intense than past projects we’ve worked on for EEME, partly because it is a larger project, and partly because there were a few times that Zachary had to stop, re-watch a video lesson, check and re-check his work, and then move on when he figured it out.  Overall for us the build time was closer to the 6 hour timeframe, mainly because he would think he knew what to do and wouldn’t listen to the lesson closely enough – and do it incorrectly.

    Project Amp-19

    As with previous projects, the step-by-step videos and instructions were very clear and understandable, each one was short enough (and could be paused to work on the step), and components were explained in great detail so Zachary was learning the how and why the amplifier works.

    Project Amp-32

    Along the way, Zachary had different opportunities to test out the amplifier and see how it worked, as well as understand the different concepts presented, such as how the sound waves work through the cones of the speakers.


    Zachary wanted to share a little bit more about the amp with you all as well and give you a peek inside the amplifier to see how it is all put together. The video doesn’t give an accurate depiction of the sound the amplifier truly puts out – the sound is much better than what you hear.

    This is definitely a completed project we will be using and enjoying for years to come – and one I would recommend considering for a birthday or Christmas gift. It is one that would be not only used, but the recipient would enjoy the time learning and creating their own working amp!

    Save 25% on Project Amp from EEME

    Save 25 on Project Amp from EEME

    For a limited time, EEME is offering a 25% discount along with FREE shipping toward Project Amp to my readers. All you need to do is follow this link.

    Learn More About EEME

    We’ve worked on several other projects from EEME. If you’re interested in learning more about their monthly subscription program, be sure to check out the below posts for more information:

    The projects from EEME are perfect for 7 to 12 year olds ready to learn about real electronic components – no experience required!