20 Best Tips

The Scientific Method Printables

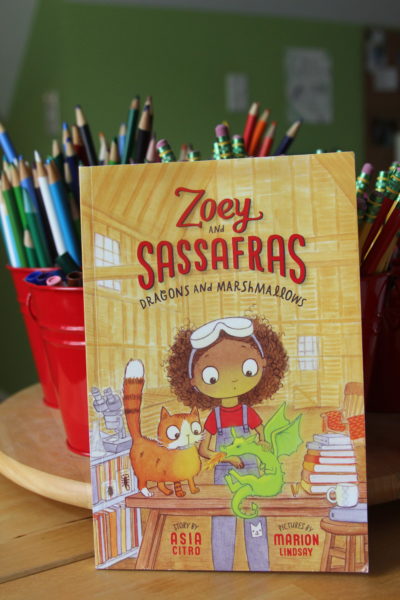
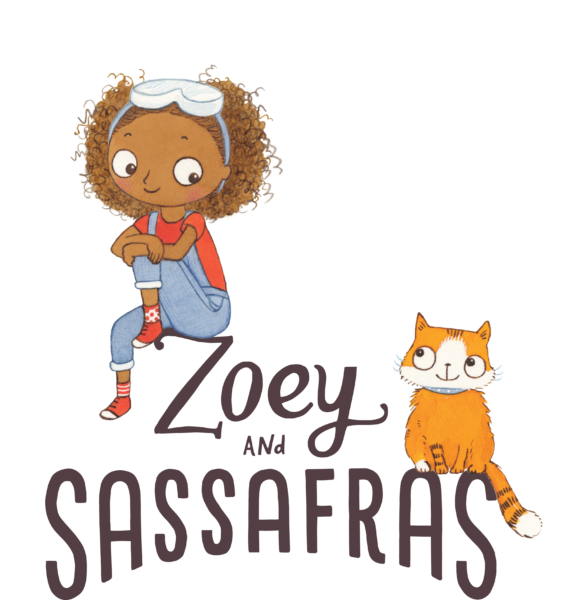
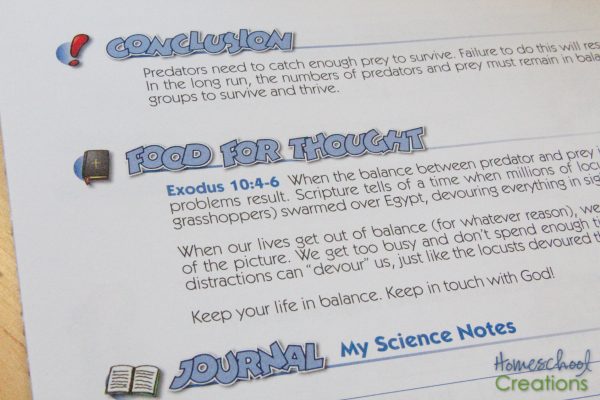
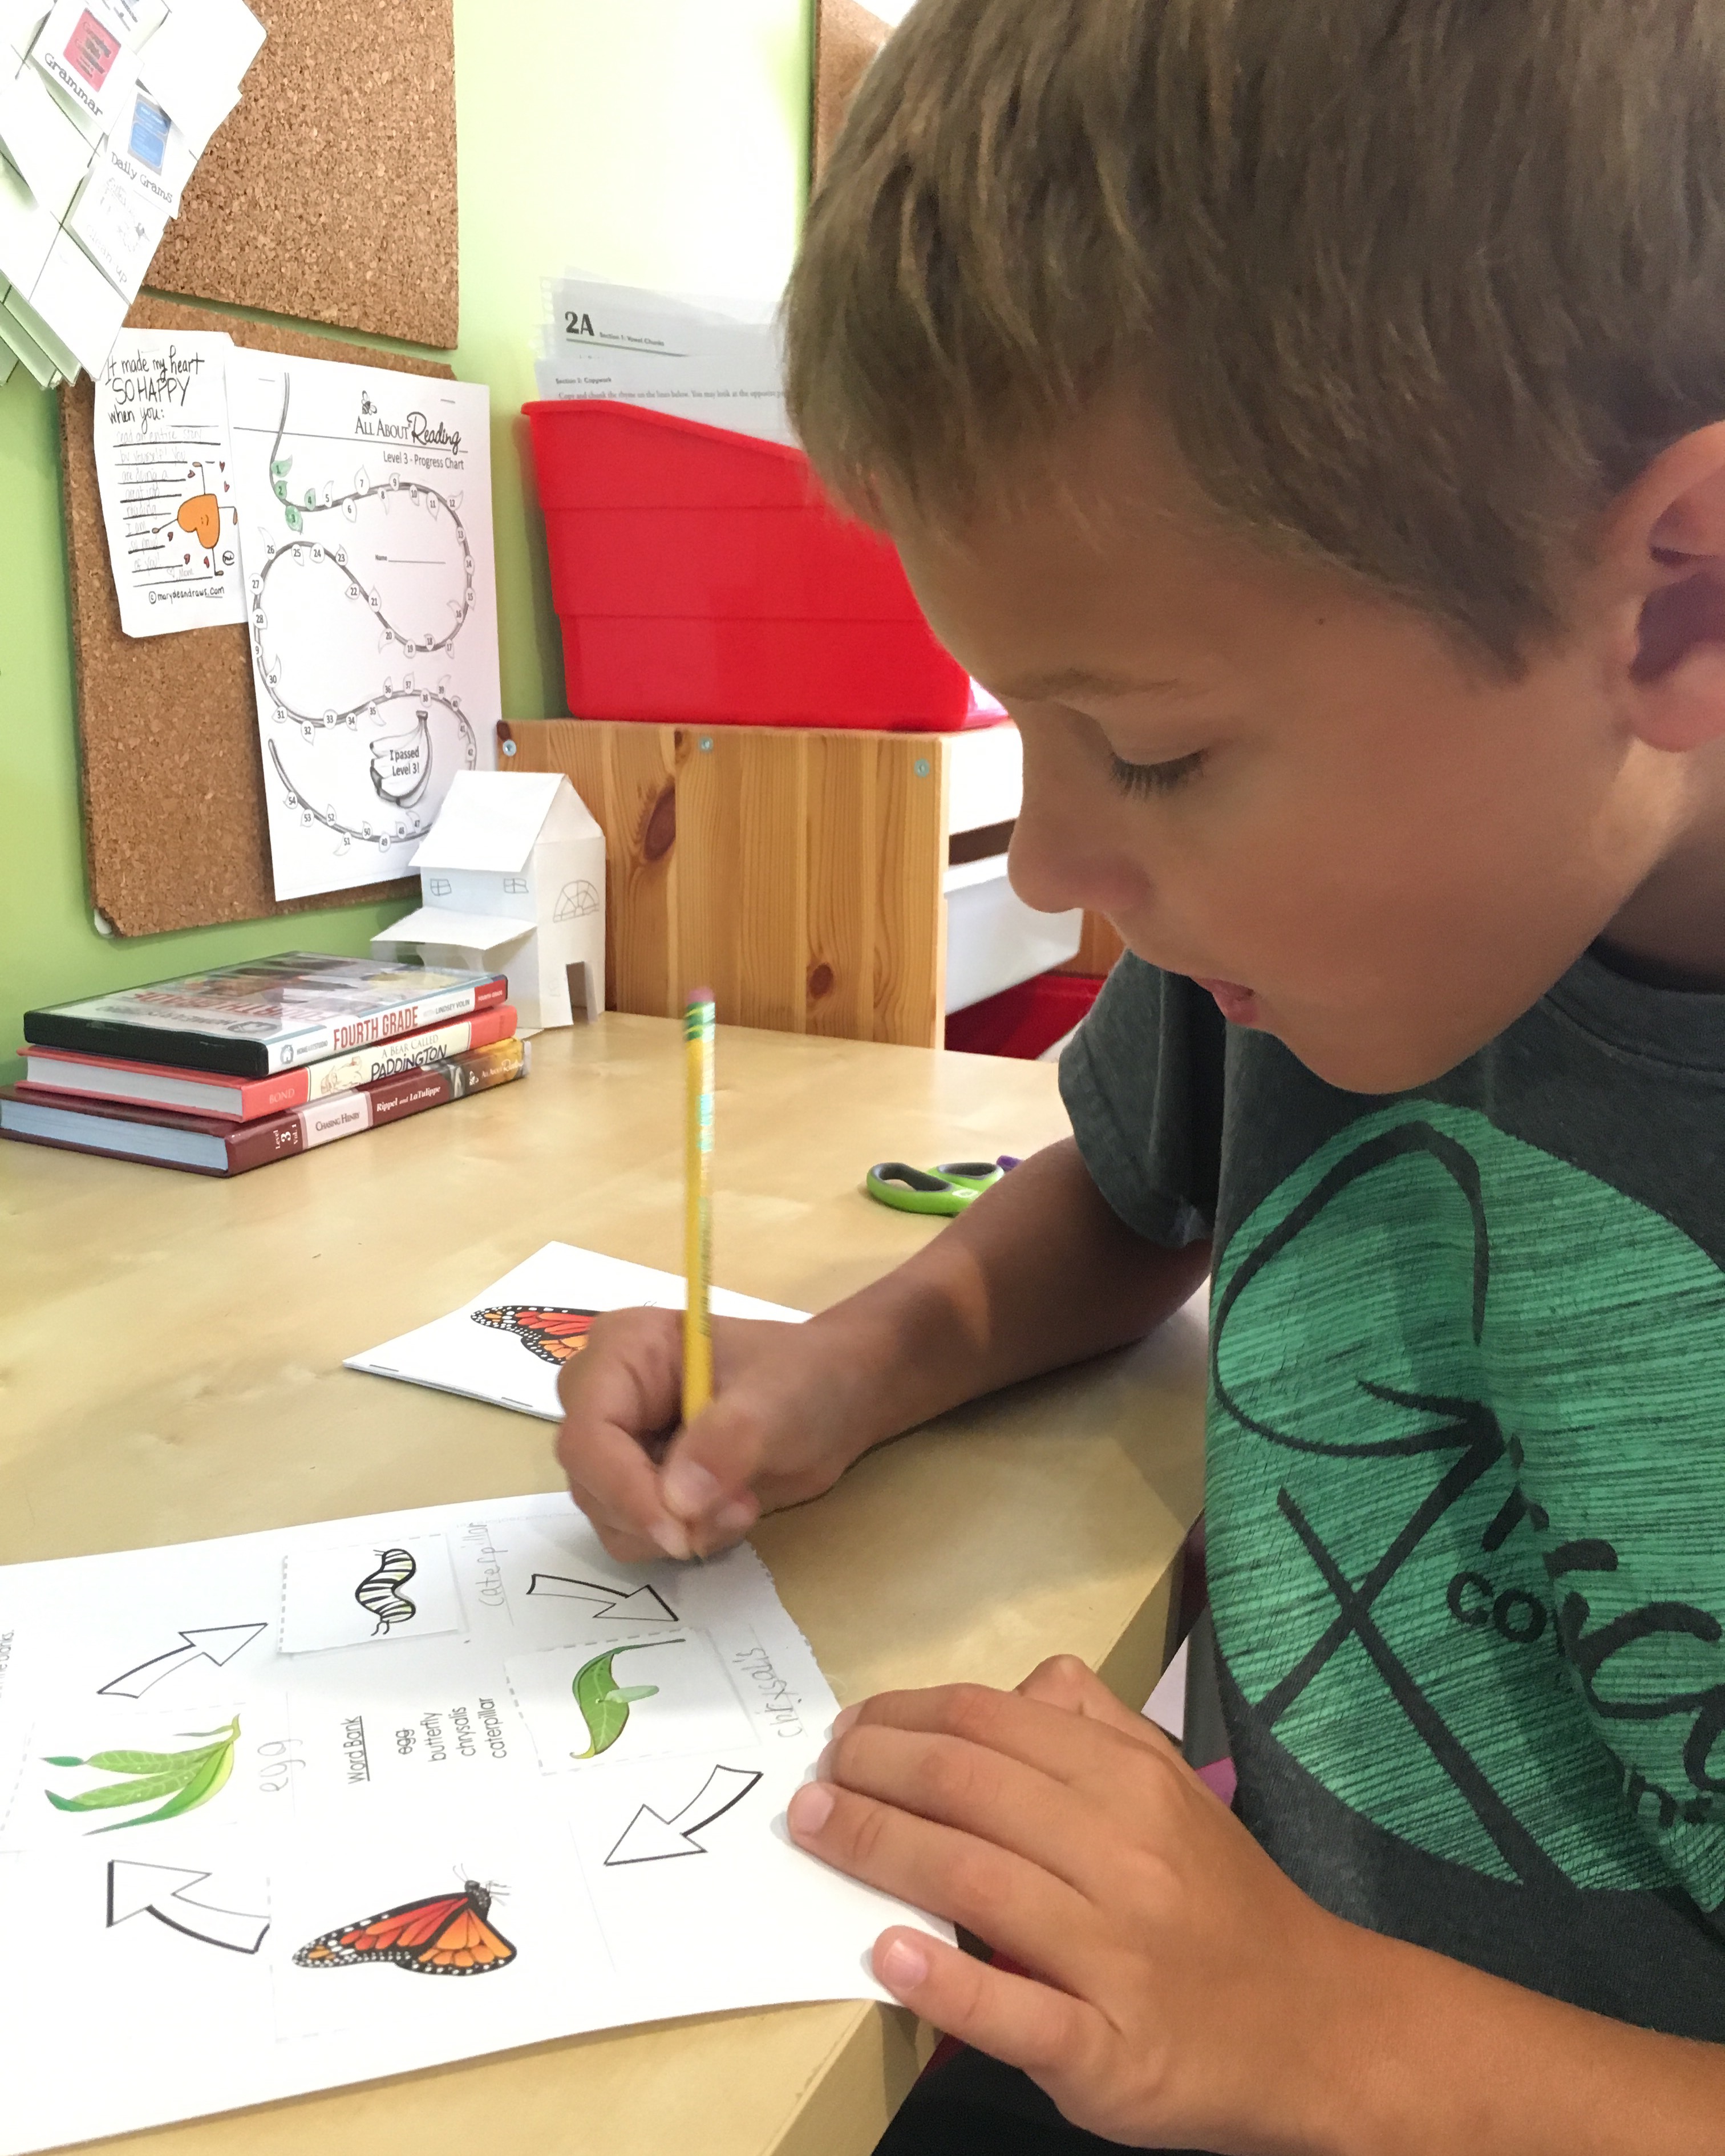
The last bit, Kaleb and I have been reading through the Zoey and Sassfras series by Asia Citro based on a young girl named Zoey, her cat Sassafras, and their adventures as they help care for magical creatures. The books are so very sweet, and they have been a great help in getting Kaleb back into the reading groove as we’ve started our school year. 

One thing that has Kaleb’s interest more than a normal book is the scientific processes that are included in the story. In each book Zoey is presented with a scenario where she has to make a hypothesis and follow through with an experiment and discover a solution to the problem: a sick dragon, a  monster with an embarrassing problem, and a stream being polluted. Throughout the stories we see Zoey’s notes as she asks questions, figures the steps in the process of her experiment, and draws her conclusions. 

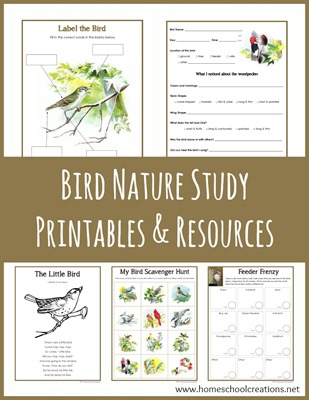
Scientific Method Flipbook

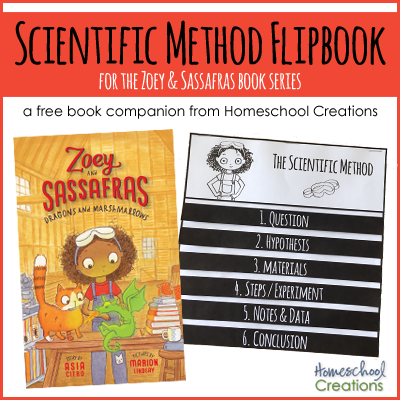
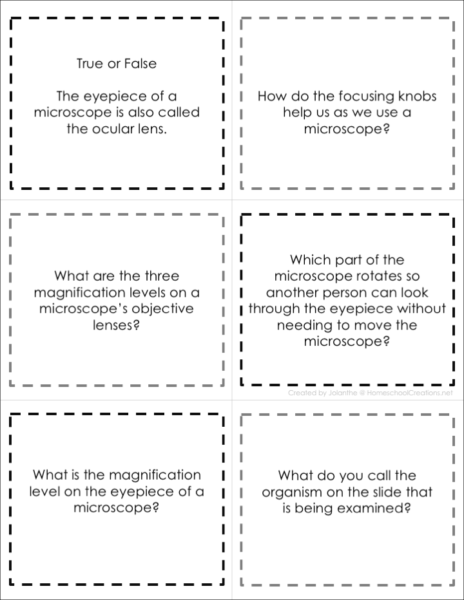
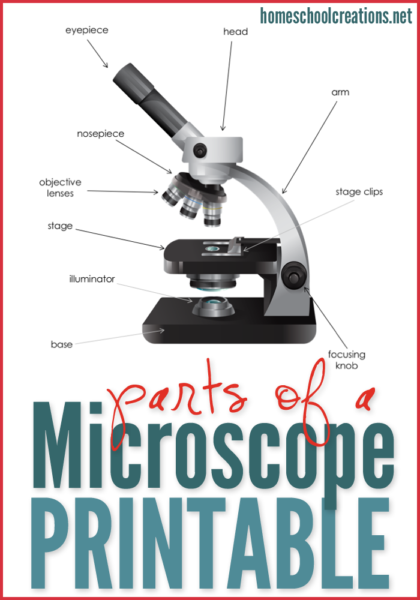
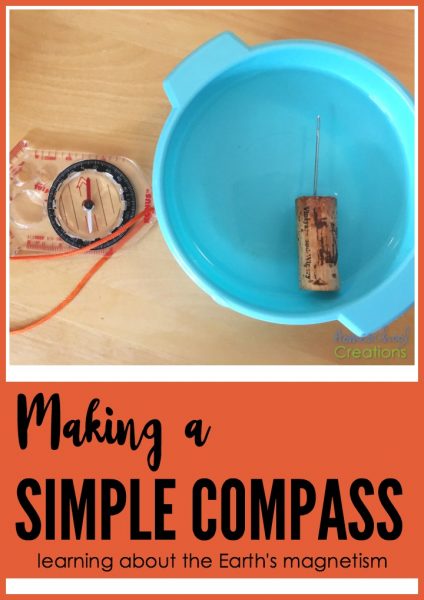
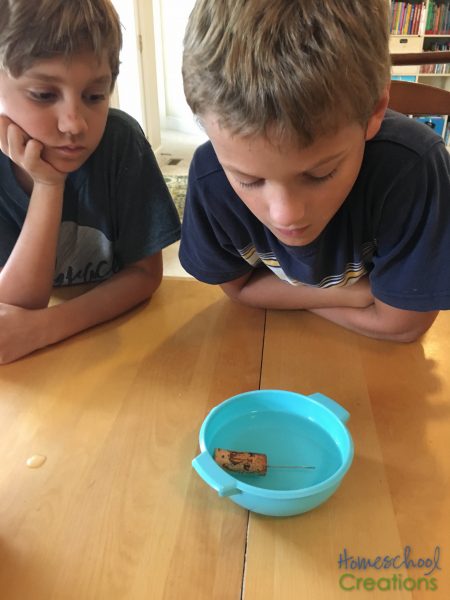
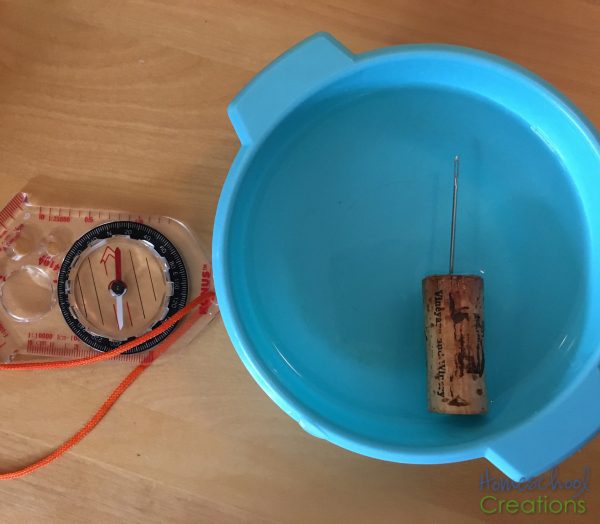
Because Kaleb truly loves science, I thought it would be fun to create a few printables to go along with the book series – and the great thing is they can also be used to go along with any experiment we work on!

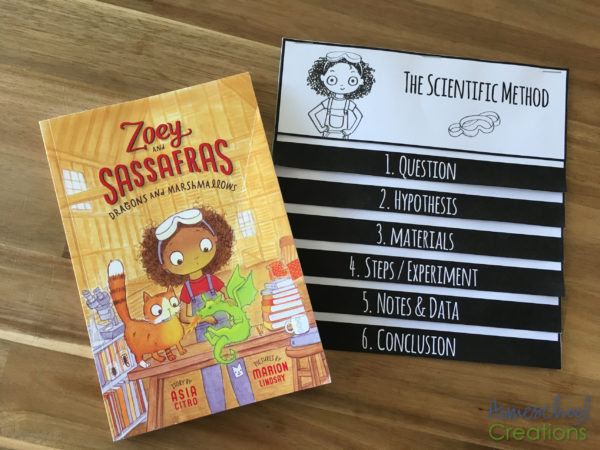
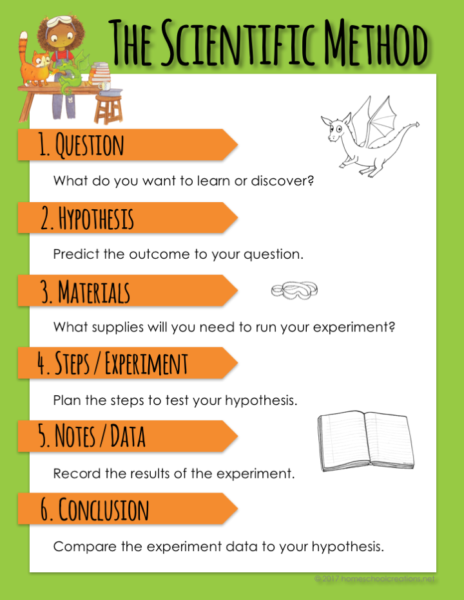
The printable flipbook focuses on the six steps of the scientific method: 

  1. Question
  2. Hypothesis
  3. Materials
  4. Steps/Experiment
  5. Notes & Data
  6. Conclusion

This free printable prints off on four pages. Once printed, simply cut along the outside edges of the rectangles, stack in numerical order, and staple along the top to create a flipbook. 


Scientific Method Poster

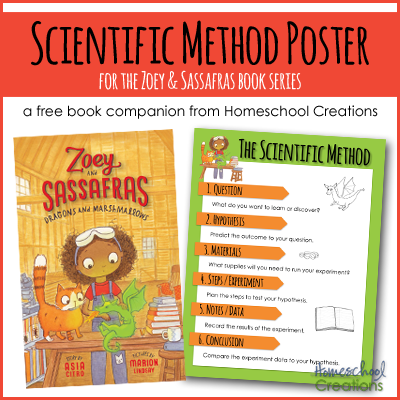
If you’d like a quick glance and reminder of the steps in the scientific method, be sure to grab a copy of the Scientific Method Poster as well. It prints off 8.5″ x 11″ and lists the various steps along with a short description. 


Additional Free Printables

I hope these two printables are a help to you all. If you’d like to find some more that tie into the Zoey & Sassafras series (and learn more about the books), be sure to visit the Innovation Press page


Parts of a Microscope – Free Printable

So our youngest is all about science anything. Experiments. Microscopes. It’s all stuff he soaks up like a little sponge and asks to do all.the.time. 

Over the past two weeks we have been learning about microscopes and spending time examining things on slides. Two of his siblings are also studying similar topics in their science lessons, so it’s been fun to work on together – especially when one project went a little south and we had mold instead of the culture we were growing. We happened to later talk about the accidental discovery of penicillin and the Noble Prize that was given for that, and Kaleb is now convinced he will be the next Nobel winner thanks to growing mold.

(I’m not as certain on the mold part in my house.)

Anyway, as we are learning about microscopes in our Nancy Larson Science 4 program (which we love, love, love), we have been working through some extra helps to make sure he is catching all the facts. I put together the Parts of a Microscope sheet for him and 12 trivia questions to go along with our lessons and he is loving it! 

The Parts of a Microscope Printables include the following worksheets:

  • a completed parts of a microscope worksheet
  • a fill-in-the-blank (or cut/paste) parts of a microscope worksheet
  • 12 trivia questions about the parts of a microscope
  • an answer page (just in case you need it)


You can read more about the Nancy Larson Science programs here (we highly recommend them). 


A Reason for Science Level D Review

Educents is a blog sponsor and we received this product free for the purpose of reviewing it. All opinions expressed are my personal, honest opinions. You can read my full disclosure policy for more details. 

A Reason for Science - a homeschool science program review from Homeschool Creations

This year I thought we would try something different for science. Instead of using a curriculum of any type, I pulled a bunch of science experiment books off our shelves and marked various activities to do with Kaleb over the course of the year. No real aim or direction, other than keep the 4th grade science lover in our home busy with fun projects. 

It seemed like a fabulous idea, but there’s one thing that continues to be a hangup of mine: preparation (aka gathering) of materials. While I am fabulous at earmarking pages and having the overall idea of what to implement, sometimes I neglect to remember the inconvenience of finding every single item needed for the activities (and with science it can sometimes be a little more tricky). Translated, that meant that up until December we did a whopping TWO experiments of the ones I had a planned and the books just sat there staring at me. And Kaleb kept asking when we would do more. 

Because science is something that makes Kaleb LIGHT UP like crazy and gets him motivated, I did a little digging in December and we decided to use A Reason for Science (Level D) from Educents with him for the second half of the school year. Complete with a teacher’s manual, student book, and a shoebox full of go-along supplies, there may have been some excitement from both of us when the box arrived. If there is anything I know about myself at this point in homeschooling, the easier I can make it for myself, the more likely it is to be accomplished. 

A Peek Inside A Reason for Science

We were able to immediately begin using the program the day after we received our box (I took a quick look through the teacher guidebook to get my bearings). Since then we have been working through the lessons and I would love to share a few of our thoughts and what we are enjoying about the program. While this has been a bit of a shift from the traditional textbook approach of other science programs we have used, I am loving the focus on having Kaleb actively learning and understanding concepts as he works through the various processes.  It’s slightly more informal, but in a structured way – if that makes sense!

Reason for Science D - Homeschool Science-36

Each level of A Reason For Science® Homeschool Pack includes a materials kit, a student worktext, and a teacher guidebook and is designed to teach a variety of concepts over the course of the year: basic life, earth, and physical science. 

Reason for Science D - Homeschool Science-13

The lesson pages are broken down in the teacher guidebook showing the category of science covered, lesson focus, objective, materials needed from the kit (and home), any safety concerns, and what to do. Images of the pages in the student worktext are given as well, along with possible answers to questions, as well as additional learning ideas and a full walkthrough with teacher insights. For me personally it took a little bit of getting used to the format (since we have used different programs in the past), but it is overall very simple to implement. 

Reason for Science D - Homeschool Science-32

We jumped right in with the first lesson – seed germination – and had to wait for our first results since it obviously required a little patience while the plants began to grow. During the week, while we waited, we worked through the questions in the student worktext, and kept an eye out for any developments in our seeds. 

Reason for Science D - Homeschool Science-29

Meanwhile, we moved on to the next lesson and talked about animal classification – snakes (a line from Indiana Jones may be going through my mind now). This lesson had a hands-on coloring and creating project – snake puppets. We talked about venomous and n0n-venomous snakes and used bulb syringes (along with one of my hubby’s socks) to show how a snake’s venom works.  

Reason for Science D - Homeschool Science-17 

Lessons also include an extended teaching section if the topic is one your child enjoys and wants to go deeper into a specific area of learning.

In the last few weeks we have worked through five lessons, but the average pace for the program would be one lesson a week – very easy to fit into the schedule and also extend learning throughout the week as well. Other than the above, here are a few additional things to love:

Reason for Science D - Homeschool Science-60

  • materials kit – hands down one of the best parts of the curriculum. So far we have had to provide very little (a sock, water, and a paper towel) – and the less I have to do, the easier it makes it to start a lesson!
  • minimal prep work – open the teacher’s guidebook and look at the materials required, pull them out of the box, and start
  • variety of lessons and topics covered in short/succinct manner, but with plenty of means for the student to learn 
  • student worktext is also full color, making it very visually appealing (teacher’s guidebook is a black/white version)
  • Scripture is added at the end of each lesson (a little food for thought) and journal space as well
  • discussion questions are a part of each lesson in the student worktext, allowing lesson review
  • lesson quiz/wrap-up is also included at the back of the teacher’s guidebook (optional)


One reader recently emailed asking how this has compared to other science programs we have used in the past. The short answer is –  a bit. :) The longer answer is we have used programs that were more scripted from start to finish (teacher says ___ and student answer would be ____). In comparison, A Reason for Science has more wiggle room and while information is provided for learning, the focus is more on the student arriving at their own conclusions through the learning process. A Reason for Science also (so far) has been a bit more hands-on for us. The full-color student text also is very visually appealing – which I love! 

10% off Educents Coupon!

Educents is offering my readers a discount code until January 31, 2017. 

Save 10% SITEWIDE with promo code STOCKUP at checkout!
Purchase A Reason for Science here!


Are You Familiar with Educents?

homeschool_ad300x250Educents is an online marketplace where you can find  affordable educational products. They provide daily deals to students, parents and educators by working with established educational suppliers. Whether it is a science kit, curriculum pack, books or art supplies, they make sure that Educents has the lowest price – helping more than 300,000 teachers, homeschoolers, and parents gain access to affordable educational materials.

Click here to browse and discover all affordable deals at Educents.

Making a Simple Compass – Learning about the Earth’s Magnetism

making a simple compass and learning about the Earth's magnetism - HomeschoolCreations.net

As part of our history time this year, each week we are working on simple projects with friends to go along with our studies. One week we may make miniature teepees, another we tie knots that sailors use. This past week we talked more about how compasses work and had fun making a simple compass of our own. 

making-a-simple-compass-2

We’ve been learning about early explorers to the Americas and talking about how they used compasses to help them find their way across the wide ocean. Truly they were much more adventurous than I am, because I don’t believe I’d be willing to do what they all did (however thankful I am to be living in North America now). 

It only require a few simple supplies to put our compass together and the best part of all – it really worked! Granted, we won’t be taking our compass on any grand ocean expeditions in the near future, but the kids were so excited and carefully watched as it found north each time. We tried it with several different needles to see if there was any difference, but all three we tried worked well.  

Making a Simple Compass

making-a-simple-compass-3

Here’s a quick look at what we used to create our compass. You’ll need: 

  • a needle
  • a magnet (a washer-sized magnet will work as well – we used one the size of a domino)
  • a cork
  • a bowl and water
  • tape (optional)

Directions: 

  1. Carefully rub the sewing needle on the magnet at least 30 times in the same direction (be sure not to rub it back and forth). 
  2. Tape the needle to the outside of the cork. We didn’t have any tape handy, so instead we poked it into the side of the cork. 
  3. Place the cork in a bowl full of water. Be sure the bowl is wide enough to let the cork rotate and move around a bit. 
  4. Once the cork has stopped moving, check and see what direction it is pointing. Compare the location to an actual compass – don’t hold the compass too closely to your homemade compass because it can skew the results. Gently turn the cork again and wait to see where it is pointing this time (is it the same area?). 

making-a-simple-compass

Why it works: When the iron/steel needle is rubbed against the magnet, the particles line up and turn the needle into a temporary magnet. The needle then aligns with the Earth’s magnetic field. 

The entire project took us less than ten minutes – super easy and a great chance to talk more about magnetism and compasses. 


Monarch Butterfly Life Cycle Printables

monarch-butterfly-life-cycle-free-printable-set-from-homeschool-creations

Everyone in our home has been watching the butterfly tank the last week. No matter how many times we observe the process, it is still fascinating. Even though we’ve talked about the process over and over again, it never hurts to review the vocabulary, stages, and take some time to savor every step of the process. 

Monarch butterfly (c) Homeschool Creations

We released two caterpillars this past week and have two in a chrysalis, waiting their turn. In the meantime, while we wait for a butterfly to emerge, we’re going to have some fun with our monarch butterfly life cycle printables – and I’d love to share them with you too! 

  • a mini-pack freebie for everyone to download
  • a subscriber only freebie (be sure to check the footer of your email for all the information!)
  • a HUGE 50 page set packed with full color and black and white printables, great for homeschool or classroom use. 

Mini-Pack Freebie

life-cycle-of-a-monarch-butterfly-printables-from-homeschool-creations-poster

life-cycle-of-a-monarch-butterfly-printables-from-homeschool-creations-word-cards life-cycle-of-a-monarch-butterfly-printables-from-homeschool-creations-vocab-cards
life-cycle-of-a-monarch-butterfly-printables-from-homeschool-creations-vocab-cards-3 life-cycle-of-a-monarch-butterfly-printables-from-homeschool-creations-vocab-cards-2


Grab the 5-page mini pack which includes a monarch butterfly life cycle poster, nine vocabulary word cards, and life cycle sequencing strips. The clip art in this kit is gorgeous and your kids will love it! 


Download button


Subscriber Freebie Pack

monarch-butterfly-life-cycle-printables-subscriber-freebie

As a special “thank you” to my subscribers, I have an extra bonus pack for you all! This set includes all of the mini-pack printables plus 4 coloring and journaling pages, a life cycle mini-booklet, the parts of a butterfly activity sheet, and a life cycle activity sheet – eight additional pages to extend the learning! To help with printing costs, this set is all in black and white. 

Subscribe button

To download, be sure to check the footer of your email under the subscriber section, click over to your special page, and grab the pack. Not a subscriber? Become a subscriber HERE and receive instant access – there are even a few other bonus freebies there for you to enjoy! 


50 Page Life Cycle of a Monarch Butterfly Learning Pack

 monarch-butterfly-life-cycle-50-page-printable-pack

I’ve also put together a larger learning pack on the life cycle of a monarch butterfly. This 50 page pack includes both full color and black and white pages (for those who want to save on a little ink or have a larger classroom). Inside you’ll find the following: 

img_8861

  • 4 full-page color posters of the life cycle of a monarch butterfly
  • full color mini life cycle cards (print 4 to a page)
  • 12 trivia cards 
  • 2 drawing a butterfly activity sheets (full color and black/white)
  • 11 page mini-booklet (full color and black/white)
  • 5 color and journal pages (full color and black/white)
  • 5 trace and learn pages (full color and black/white)
  • monarch butterfly life cycle poster (full color and black/white)
  • 2 life cycle activity sheets (full color and black/white)
  • parts of a butterfly activity sheet (full color and black/white)
  • life cycle sequencing strips
  • 9 vocabulary picture/word matching cards
  • 8 mini sequencing cards with added stages (full color)

Purchase and download the 50 Page Life Cycle of a Monarch Butterfly Learning Pack in my Teachers Pay Teachers Store for $3.00


I hope these printables are a help to you all as you have fun watching monarchs grow – it’s such a fun process! 

Additional Printables You May Enjoy…


Bird-Nature-Study-Printables-from-Homeschool-Creations.jpg Insect Nature Study Printables from Homeschool Creations


Our Favorite Homeschool Math Curriculum

Almost seven years ago, in 2009, we were facing tears and much drama when it came to math time. One of our daughters knew her facts and could compute facts in her head with little problem, but when it came time for her to figure the answers and write them down on paper, it became a very long and drawn out process. She would second guess herself. Recheck her problems over and over. What should typically take little time, turned into tears and frustration, and led to one girl strongly hating math. 

It was at that point that we put the worksheets aside, turned to some friends for advice, and ordered Teaching Textbooks to try. It was a perfect fit, and we immediately ordered a level for our youngest daughter as well. The changeover was made to the program for all of our kids once they were able to work on the first level of Teaching Textbooks, and we have used it ever since. Truly, it’s a program that I recommend to all of my friends, especially those that dread teaching the upper levels of math. (You know who you are.)

While math was one of my favorite subjects in high school and college (there is something oddly satisfying to me to be able to work out a problem and have a tangible solution to that problem), I will admit my brain has a hard time switching between Algebra 2 and 4th grad math. Call me crazy, but having Teaching Textbooks has been a magnificent relief to my over-stretched brain. For this upcoming school year our kids will range from 5th grade math up through Geometry. The mere thought of that makes my brain hurt – yet happy, since I know we have a solid program in place to teach the kids. 

All Levels of Teaching Textbooks are Self-Grading

If you’ve ever had to grade endless papers, especially when you get to the high school level, you will be most thankful for this feature of Teaching Textbooks. (Pre-Calculus will be self-grading as of August 2016). A few years ago we had a non-grading version of Pre-Algebra, and OY! Let’s just say it was a huge headache. It was well worth it for me to upgrade to the self-grading version and take that hassle off my hands, especially when we took into consideration that three other kids would be using the program as well. As a parent, the gradebook is EXTREMELY helpful. For our high schooler, I can print off a copy of the gradebook to include with transcripts. 

The Kids Can Work on Math Independently

First-2-weeks-of-homeschool-August-2015-6.jpg

A laptop and a set of headphones, along with the program, is all it takes to get started. You don’t really need the headphones, but if you have kids that are distractible (or perhaps a parent who can’t focus – ahem), headphones are a wonderful addition. Each of our children can work on their math lessons independently, from third grade and up. The lessons are typically read/spoken to the children, and once they do the solving of the problem, they know immediately if an answer is correct/incorrect. 

For our children, this immediate feedback has been key for them in moving through lessons quickly – and quickly identifying areas they struggle grasping. Because I can see their grades as soon as the lesson is completed, I can also check to see what problems they may have answered wrong, and help them if needed. 

Continual Review and Second Chances

Each level of Teaching Textbooks includes continual review, so you can be sure your children are mastering an area. In addition, kids are also receive a second chance. There are times when our kids figure up the correct response, but type it in wrong, and other times when they get it entirely wrong. Receiving a second chance allows them a moment to look back over the problem, re-figure, and enter in the correct answer before moving on. 

We Can Use the Program With Multiple Children

With four kids, I want to find curriculum that makes sense for our family monetarily as well. While the upfront cost of the program can seem intimidating, when the cost is broken down between four children, it becomes very manageable. Once a level is purchased, we don’t have to re-buy the program (unless the kids use the workbook). 

Our kids work primarily on the computer, and refer back to the workbook, but do all of their figuring and writing on graph paper, making it a great way to pass the programs on to our younger children. 

Thorough Explanations and Understanding

Last year we let our oldest help choose her curriculum for the year and took her input regarding a few subject areas. She decided to try something other than Teaching Textbooks for Algebra 1. Within the first three months of the switch, she was growing increasingly frustrated, even though I was able to help explain concepts, and also find some video clips for harder concepts. By mid-semester she came and asked if she could switch back to Teaching Textbooks. She decided to go to the very start of the Algebra 1 program and work through each lesson. It wasn’t that one program was easier than the other, but the lesson walk-throughs and explanations of Teaching Textbooks gave her a solid understanding and were not as confusing to her as other programs (let’s face it, Algebra isn’t for everyone). 

The Program Travels Well

Although we do try to plan our vacations not during typical school weeks, there are times when we have doctor’s appointments or the kids are at their grandparents. The only thing they need to bring along is the CD-ROM portion of the level and then pop in a disk to complete their lesson. Now granted the kids may not be entirely thrilled about this part of the program, but it definitely is a benefit for me! 

Parental Override on the Grade book

Parents can also go into individual lessons and see how many problems were completed, marked wrong, and also if the solution to a problem was viewed. For several of our children, this is key. While a perfect score isn’t always possible, we do want to make sure the kids fully understand the concepts being taught (especially since math concepts build upon each other). When I look at the grade book each week, one of the key things I check is if our kids have viewed the solution. Each time they get a problem wrong (and after they have a second chance to answer it), they are given the chance to see the problem solved in front of them, and the ‘teacher’ walks them through the steps. 

As a parent, you can also choose to delete an answer to a problem or have a child redo an entire lesson. For one of our children (who gets frustrated with one or two problems wrong), I will delete the answers and let him go back in and retry it. It’s something little, but it makes a huge difference for him. The key is having him master the concept even though I’m not expecting a perfect score. 

When Your Computer Dies…

Over the last three years we have had TWO laptops bite the dust, one an accidental dropping and the other a complete fail. We were able to pull out the hard drive on both laptops, reinstall the programs onto our new laptop, and transfer the grade books over to the new computer with no problem (incidentally, the folks at Teaching Textbooks are fabulous to talk you down from a proverbial ledge should this ever be an issue for you as well). I’m rather adept at it now, so local friends, I’m happy to help if you need it. 

Not Sure Where to Start? 

Teaching Texbooks offers placement tests for your children so you can get a better idea where to start them off. Click here to take a peek.