20 Best Tips

President’s Day Handwriting Pages (Free Printables)

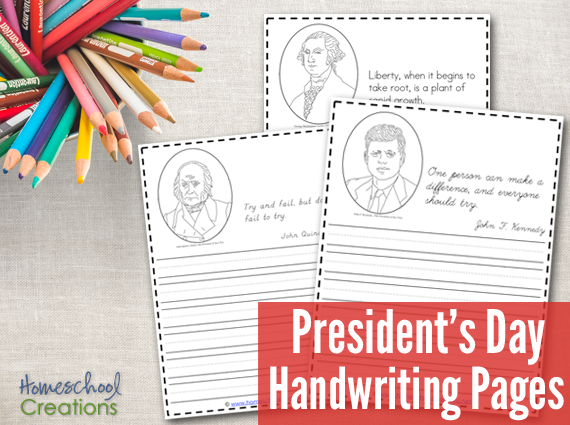
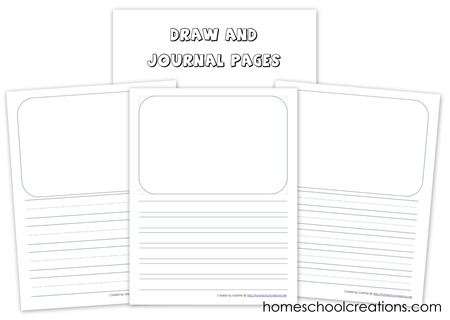
President’s Day will soon be here and there is a 4th grader in our house who loves handwriting practice (no, he really does!) and also a 6th grader who can always use some cursive practice, so I decided to create some President’s Day Handwriting Pages for both of them. 

(Even though we don’t use the D’Nealian font, I know some of you all do, so I included copies of those as well – and you can download them all FREE!)

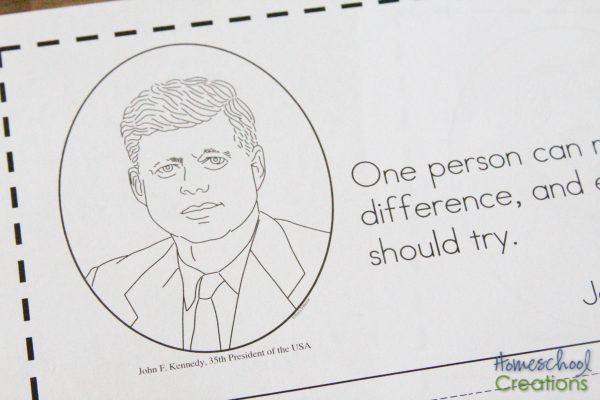
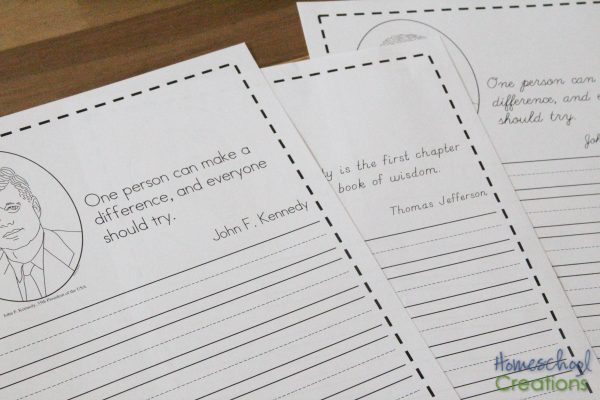
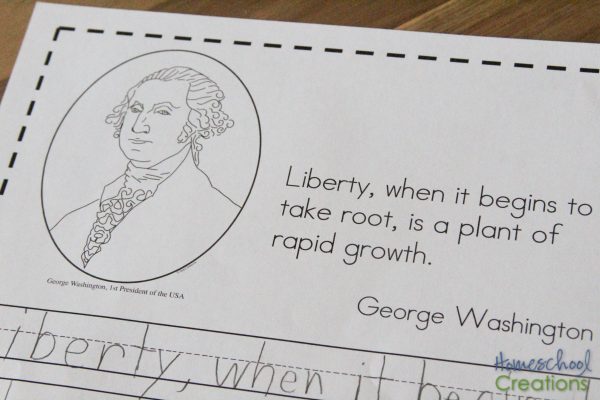
As a bonus, each of the quote pages also includes a small portrait of the president quoted that can be colored (if your child likes that). 

For our youngest, these will also be some great reading practice for him (I’ve talked quite a bit recently about how he struggles with reading) and discussion on what the quotes mean. We will also be working on his overall penmanship. While he balks at writing typically, he loves short pieces of copywork like this, so we get in all the practice we can!


You Might Also Like…


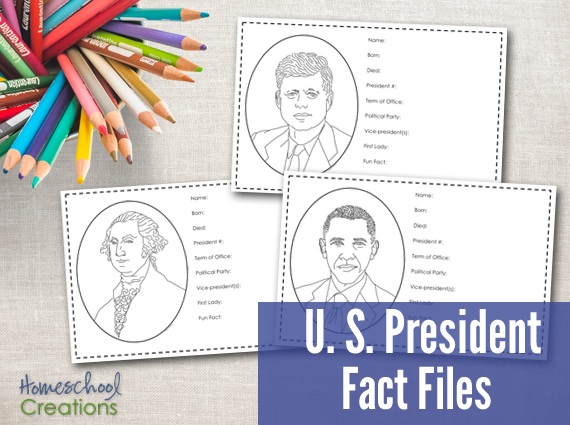
If you enjoyed these printables, be sure to check out the U.S. President fact files – another FREE printable download for all 45 presidents! 


Download now…and enjoy!

What is Your Teaching Style?

Homeschool Teaching Styles and Philosphies.png

When I started homeschooling over eleven years ago, I had no idea that there were different homeschool teaching styles (or philosophies, if you prefer to use a fancier word). I just started on my merry way and a few years later someone asked me if we were Charlotte Mason or Eclectic.

Say what?? Who in the world was Charlotte Mason and eclectic…well, that just sounded so scattered!

Honestly, I had no idea what my answer truly was, and it was something that made me sit down and look things over (because my Type A personality just HAD to know). For those of you newer to homeschooling, or maybe as clueless as I was, a quick look at several of the different approaches may be helpful to you too. 

What are the Different Educational Philosophies?

Just like our children are all different, there are many different ways that we can approach teaching our children. Believe it or not, we as parents are different too and have different ideas and beliefs on how to best approach education. These approaches aren’t just in the homeschooling realm, but also exist in the public school realm as well.

It’s great to have a basic understanding of the different philosophies and honestly, they each have aspects that are helpful. Don’t put down one idea over another. There is something to glean from each area!!

This post briefly covers a few key philosophies:  Traditional, Charlotte Mason, Classical, Unit Studies, Unschooling, and Eclectic. Keep in mind that you may identify with parts of different philosophies – and that’s okay!

Traditional

This method revolves more around traditional textbooks and worksheets to determine if a child is learning. Work may be graded, tests given, etc…and can look more similar to a traditional school setting. Many may say it just is the school classroom dropped into a home.

Your family may use this method in certain subject areas and not in all (for example math or grammar). It may also be your overall teaching style as well (we have friends who follow this method exclusively).

A few companies to consider for the traditional method: A Beka and Rod and Staff.

clip_image002

image courtesy of Microsoft

Charlotte Mason

This philosophy began in the 1800’s by a woman named Charlotte Mason. She believed that children should learn from real life through playing and creating. Part of the real-life learning would include plenty of nature walks and art studies. Instead of textbooks, children use “living books” – or books that make subjects come alive. This approach also includes more discussion and narration, not test taking for determining learning.

Helpful texts for this approach include A Charlotte Mason Companion by Karen Andreola and Ambleside Online.

Classical

This method uses the Trivium: reason, record, research, relate, and rhetoric. Not sure what that means? In the early stages of learning, children learn the basics of reading, writing, and math. They then move into the grammar stage, then the dialectic stage, and then rhetoric (usually high school age).

One of the key things that you’ll notice about this method is the four year teaching cycle of history and science (the topics repeat every four years). We have followed this approach in our history studies and you may already be familiar with a text that follows the classical approach, Story of the World. This method also frequently focuses on learning Latin as a part of study.

Helpful texts for this approach include The Well-Trained Mind by Jessie Wise and Susan Wise Bauer and Teaching the Trivium by Harvie and Laurie Bluedorn.

clip_image002[5]

image courtesy of Microsoft

Unit Studies

This method of study is fairly straight forward. If your child is interested in the ocean, you would read  books that covered that topic, write about topics that related to the ocean (writing/grammar/spelling), learn more about scientists and animals {science}, etc. It can also be tied into a literature theme (i.e. based on a book that is read together).

Basically, unit studies cover a certain theme. Some parents may come up with all of their material on their own for a theme, but there are many companies and sites that offer lessons and ideas packaged together. It might get a little trickier as students get older to include all subject areas. This is how we initially started our homeschool journey – with country studies that led us around the world and studying all sorts of different things!

A few companies that use the Unit Study approach: Five in a Row and Konos.

Unschooling

This method would be mainly opposite of the public school philosophy. Instruction is led by the interests of the child and is very relaxed. Formal lessons may not be involved. It follows the belief that children are all curious and natural learners and they will continue to learn as they grow and develop.

Book for further learning: How Children Learn by John Holt.

Eclectic

Basically, this method focuses on a little bit of this and a little bit of that. It’s eclectic! Maybe you are classical in your history approach, Charlotte Mason in science, a bit more traditional in math, etc… You cover subjects with your family in a manner that best suits your individual needs.

What is Your Teaching Style?

Quite honestly, our family fits more in this latter category now that we are a bit down the road of homeschooling. Depending on our children, we’ve adjusted pieces of our curriculum (and teaching) to flow with how they learn best and what works with our family.

Over the years you may notice your teaching style changes – that is fine!! Don’t panic! Be sure to read up on the different philosophies and do a little more research on your own too.

Have you determined your teaching style? Leave a comment below and tell us yours – we’d love to hear.

Homeschool Basics

This post is a part of the Homeschool Basics series. Be sure to read the other posts if you are just joining in. For the record, I am not an expert. I’m a homeschool mom who is sharing what she’s learned so far along the way with her own family.


5 Things to ADD to the End of Your Homeschool Year

With the end of the homeschool year in sight for many, there are days when motivation is running L-O-W and the desire to be done is on the opposite end of that spectrum. It may seem an oxymoron, but really, there are five things you can add to the end of your homeschool year that may help you finish the year strong!

 5 things to add to the end of your homeschool year from Homeschool Creations

5 Things to Add to the End of Your Homeschool Year

I know, I know. Who has time to add anything in? Right now, it seems like we are barely holding on. Distractions are running rampant (spring fever anyone?). Kids are gazing out the windows, wondering when all this book-stuff will be over with. Let’s face it. Years ago, when spring rolled around the corner, we were doing the same exact thing as students. 

Years later and even as the teacher I’m looking out the same window ready for the final countdown. 

Here are 5 things you can add to the end of your homeschool year to finish it off well. Maybe there are a some that you haven’t tried yet! 

A Different Location

Our schoolroom is quite honestly the last place we have been spending time lately. I know – that wonderful space we put so much thought and effort into. But it really isn’t going to waste! It’s easy to forget the world offers some wonderful places to stretch out and learn. A front porch swing is perfect for reading together. A blanket on the lawn in the warm sun is a great place to work on math. Swinging in a hammock means grammar time will go by a little more quickly. 

Wherever it is – outside or in- the world is at our fingertips. Maybe there is a fun playground nearby (hey, those public school kids are still in school and not hogging all the equipment) where you can sit on a bench and work on some math, take a 10 minute play break, and then get back to another subject. 

Fun Days 

swing-1188132_1920

Make Fridays ‘fun days’ or start scheduling in some field trips. Often those are the first things we eliminate from our homeschool time because we get so caught up in the academic work that needs to be accomplished. But don’t forget, learning can happen anywhere. There are so many amazing educational field trips and just because they don’t fit in with a particular historical period you are studying or a unit you are learning about, doesn’t mean that trip won’t teach you and your kids a thing or two. 

Schedule an end of the year field day or plan some joint fun days at the park with another family – get out and enjoy your time together as a family! While you’re at it, be sure to plan in a celebration day too! Make banana splits for dinner or have a Wii night – let the kids choose how they want to celebrate the upcoming end of the year. Having fun stuff in place makes the time fly faster and keeps everyone motivated to finish up!

Flexibility

Contrary to popular belief, you don’t have to check off every.single.box in your lesson plans. Oh, a good plan is always lovely, but when that plan gets in the way of stimulating learning, it’s time to add in a little flexibility. 

Take a look at what curriculum still needs to be focused on, sit down with each of your kids, and see if there is a way to be flexible with what remains. Alternatively, ask your kids if there is anything other subject they are interested in focusing on the remaining time of school and don’t be afraid to switch it up and focus on a new learning area!

Incentives

It’s important to teach our kids that we finish what we start. Set a goal – and a reward – to the completion of your school year. It can be as simple as a trip to your favorite smoothie shop (especially when drinks are half-price in the morning) or an afternoon of bowling. As adults we work hard when there are incentives on the line and our children are no different! It’s not bribery, it’s encouraging them on. We don’t need to offer them all year long, but sometimes an added bonus is nice and makes us work even harder!

Encouragement

Who doesn’t love a little encouragement? While hearing something verbally is wonderful, sometimes having a written note to remind a child of a job well done can be an added reason to press in and keep going! 

Pull out that old set of notecards or print off some fun ones here. Stick them in your children’s books, bags, or under their plates, but remind them of the great job they are doing, how much you love them, and how proud you are of them. We all need to hear that! 

5 things to add to the end of your homeschool year


How do you keep your children focused

and finish the school year strong?

Tell us in a comment below!


Another few posts you may enjoy….Why Your Homeschool Needs a Rest Time….

Why-your-homeschool-needs-a-daily-rest-time.png

…and 10 Things to Eliminate from Your Homeschool.

10 things to eliminate from your homeschool

Jellybean and Toothpick Structure STEM Challenge

Jellybean and toothpick STEM challenge - building a structure that supports weight

For one of our most recent STEM classes at co-op we took advantage of Dollar Tree jellybeans and an overabundance of toothpicks. The kids have had so much fun with our hands-on challenges and learning about the best ways to build structures that are weight bearing and can stand a little pressure.

IMG_6948

Initially we divided up into four teams of 2-3 students each but gave the kids the option of combining with one other team to build their jellybean and toothpick structure. The kids decided that was definitely the better option and quickly moved together. They also realized it provided them with more jellybeans for eating, should they not used two entire bags for their structure (smart kids).


IMG_6951

One of the BEST things I heard came immediately after the kids combined (and while I eavesdropped on their strategy talk). Both teams were discussing the best way to build a structure that would support the most weight and still have a good height. From each team, the words “a triangle allows the strongest support” was heard. (Yes, they are listening!!)

IMG_6952

KEVA Planks were used as a sort of ‘holding pen’ for one of the teams – they didn’t want to risk floor contamination of jellybeans that may possibly be edible later. The other team obviously had no regard for where their beans ended up.

IMG_6955

IMG_6947

Both teams worked with a triangular setup for their structures, although one took a more systematic approach, setting up an assembly line of sorts. Team members started the process of putting a toothpick into a jellybean and creating piles, while others created pre-made triangles for another team member to work into their structure.


IMG_6953

Overall both teams had a blast with this challenge.  One structure was definitely more organized and that may be the team that wasn’t distracted by eating jellybeans along the way. 

IMG_6954

While Team 1’s structure was taller overall, it came to a definite peak and would not support as much weight when added (we stacked file folders on each structure to see how many it would hold). Team 1 eventually lost their triangular structure as their building continued( see the note on jellybean consumption), lost focus, and that ended up being their downfall.

IMG_6960

Team 2 had a much wider and elaborate base design (neater overall) thanks to their assembly line process. While their structure didn’t reach quite as much height as Team 1’s design, it supported more than twice the weight since it was able to more evenly distribute the weight when stacked.

(And jellybeans were consumed by all).

Such a fun and sticky challenge. Incidentally, picking up a box of 500 toothpicks that are spilled can be pointy and painful.


Additional STEM Challenges


Umbrella Challenge – STEM Activity for Kids

Umbrella STEM Challenge - create a shelter to keep a tissue dry

This past week in our co-op class we worked on another ‘instant challenge’ together, breaking up into four teams to create a structure that would keep a tissue dry. Out of all of the projects we have worked on so far, this one seemed to click with the kids.

Each week we have divided into groups, raced to finish a project using the few items provided, and at times there has been grumbling of “they copied our idea” or frustration when what seemed like a great plan literally crumbled to pieces. While not everyone was successful in their building endeavor, the umbrella project brought everyone together and helped the kids see the importance of teamwork.

The Umbrella Challenge

We brought a large Rubbermaid bin into class, 2 quarts of water, a colander, a tissue, and a container (to keep the tissue from touching the bottom of the bin).

Challenge: Create a structure that would keep the tissue dry when water was poured (like rain) over it with a set amount of materials.

Materials: 2 pieces of paper, 3 rubber bands, 4 pipe cleaners, 3 playing cards, 2 pencils, 2 paper cups, 4 pieces of tape, 5 cotton balls, and 3 rubber bands.

Also needed: water, colander, tissues, and a large plastic tub.


Team Results

The kids were broken up into four teams and given a short amount of time to chat with their teammates and decide on a design idea. As soon as they had an idea they set to work on their designs. The structures could be tested at any time by the students, but had to keep the tissue dry when the teachers tested it.

Team #1

Umbrella Challenge

One of the creative things this team did was use the cotton balls as the corner bases, attaching them to the pipe cleaners. While their structure was stationary on the carpet, when placed in the tub, it slipped around, so they added them to give stability, knowing when the water fell in the tub it would be soaked up into the cotton balls and give it a little more weight.

They also poked the pencils through the corners of the paper to give it a good arch and place the playing cards on the top so the paper wouldn’t soak through as quickly.

Umbrella Challenge-9

We poured the water over top and their design was successful – the tissue stayed dry. Out of all of the supplies, they didn’t use the cups or rubber bands, but did use everything else.

Team #2

Umbrella Challenge-14

This team didn’t use all of their supplies (rubber bands), but created a narrower shelter, using the pencils as the base and paper cups to provide a ‘run-off’ area for the water. Overall, they didn’t have a solid structure and needed to use the tub to support the ends of their shelter (while it was supposed to be free-standing).

Umbrella Challenge-19

When the water was poured over, the structure was too narrow, so the tissue did absorb some water. While in theory it did seem good, the overall design didn’t quite work.

Team #3

Umbrella Challenge-23

This team earned some points for creativity and strength. Their legs were very stable (good idea rolling the paper to create a stronger leg that wouldn’t get floppy when wet as quickly). They used almost all of their materials (they chose not to use the cups).

Umbrella Challenge-30

Although they had a great base to start with, their structure wasn’t wide enough to cover the tissue when the water was poured over it and ended up soaking wet.

Team #4

Umbrella Challenge-34

While team 4 didn’t quite use all of their material creatively (ahem – the rubber bands were dropped on the top so they could say they has included them), they did have a great base for their umbrella using two pencils as stability to the pipe cleaners looped through the corners to lift it up above the tissue. Their top was also thick so the water would stay off the tissue (using cards and two sheets of paper with the paper cups cut up inside to provide extra protection). Not a beautiful structure, but it stayed together!

Umbrella Challenge-39

When the water was poured over their structure, the tissue stayed dry!

The Importance of Teamwork

While the teams were busy working, there were a few complaints of ‘they are copying us’ (even though the other team wasn’t looking) and frustration when what seemed like a good idea, turned out to be a flop and plans had to be re-worked (and still flopped).

Umbrella Challenge-40

Although I had seen two of the teams beginning structures, I pulled out my own set of supplies and decided to put something together quickly. Ironically, my structure was very similar to one of the other teams (team 4) that I hadn’t seen until we all came together as a group.

Umbrella Challenge-42

My structure used the paper as the ‘umbrella’ with the three cards together underneath and held up the the pipe cleaners. The rubber bands were used to keep the pencils closer together so the paper would arch and not spread out too far when it became wet. Not too shabby for about 4 minutes of quickly building.)

As a class we had a great talk about how there are times when we may be working on an idea or concept, have the same supplies or focus, and each of us may have some similar plans, but may tweak it in a different way. It isn’t copying, but sometimes just happens. The process of discovering what does and doesn’t work often leads us to a better way of creating something.

Umbrella Challenge-47

Coming together as a group, we took the best ideas from each team and built a structure using those designs and had an even better structure. The cups were cut in half and we added slits to create addition ‘run-off’ areas and also provide a way to keep the paper in a tent style. The three playing cards were bent in half over the paper to create a more waterproof peak.

Note: We didn’t have enough time to fully build it, but would have added the pencil and pipe cleaner base from Team 4 to keep the paper up and out of the water.

While individual teams had good ideas, together, as a whole, the best one was created. It was really a great ‘learning’ moment and helped diffuse some of the frustration between the kids – team building at its best.


A Few Other STEM Activities You May Enjoy


Why Your Homeschool Needs a Rest Time

Why your homeschool needs a rest time

When hearing the words ‘rest time,’ it takes me back to my years as a preschool teacher when the kids all had a nice mat, a warm blanket, and sleep drifted over (most of) the kids. There are always a few rowdies in the bunch!

As we started our homeschool journey, rest time was ALWAYS a part of the equation. Our kids were young. I was exhausted with the little ones (we had 4 kids 5 and under) and it was definitely a non-negotiable in our day. Now we are years down the road, our oldest is 14, and rest time is STILL a part of our day.

Here’s the thing – as homeschoolers, our family is around each other all.the.time. Pretty much 24/7. That can be exhausting, especially for kids (and moms) that need quiet to recharge. So much surrounds us that can overstimulate and push us over the edge, so to speak. For kids that are extroverts, well, it always good to practice giving others space as well – and they need the down time too.

Think we’re crazy? I promise you, I’m not! You NEED a rest time in your day, moms!! We can’t keep up a crazy pace and not feel like we’re going crazy ourselves!

Somehow the last few months we’ve gotten out of the habit of having our afternoon rest time. And it has truly shown in attitudes (mine and the kids) and mental states (that would be my sanity – keeping it real!). While I’ve had people ask how we can afford to take the time out of our day, I can honestly assure you, if anything, it has made things run so much more smoothly in our house.

What Rest Time Looks Like for Us

IMG_6520

Rest. Sitting down. Feet up. That should sum it up, but each of the kids typically heads to their bed (if they want to sleep, go for it!). Rest time an opportunity for everyone to slow down and have a break from each other. I’m guessing my kids aren’t the only ones who can get on a sibling’s last nerve (or mine). The break and space apart is very beneficial to attitudes all around.

This includes mom! My spot is a cozy chair or under a blanket on my bed with a nice cup of coffee or tea. Books are almost always a part of my rest time, especially since I have a wonderful pile of books to read! I might even sneak in an episode of my favorite show without the kids peeking over my shoulder (Shhh!! PBS fans will understand, right?).

The kids are encouraged to grab a book (for fun – not school), listen to audiobooks with a sibling (or with headphones), listen to music, or play – QUIETLY. It’s not a time to be rowdy and fool around. The boys pull out a bin of LEGOS on their beds and dig through that while they listen to audiobooks they picked out from the library or build with some other fun toy.

Puzzles, quiet games…think of all those hardly used manipulatives you’ve stashed away. Pull out art supplies and sketch pads. You know what things are special for your kids (or hiding in your closet).

The impact of rest time was especially apparent to me today as I declared the hour of 2 – 3 pm sacred and the kids pulled out sleeping bags and hammocks and set up camp on the back deck (the girls may be a bit excited about their hammocks). They had books and stayed outside snuggled in their blankets (it was 48 degrees) for almost 2 hours. And do you know what happened the majority of the time – laughter. It literally brought tears to my eyes because we had a ROUGH morning. ROUGH. When rest time was well-past over, the kids all came in and attitudes were great toward each other. I may have also been completely relaxed because of hearing the calm and camaraderie between the four of them. My time was spent curled up reading two great books:  The Life-Giving Home and Raising Grateful Kids in an Entitled World.

A complete win-win all around. (And my hubby may be extremely grateful for my sanity too).

What Our Rest Time is NOT

  • Catch-up on housework is a no-no. Rest time is NOT a time for me to scramble around the house doing all those little things that I’ve been putting off and finally remember to do. I have a list next to me where I can jot down notes if something comes to mind, but otherwise, computer is off.
  • Schoolwork is put aside. Yes, the kids sometimes get behind, but this isn’t a punishment time for them when they need to catch up on every last little thing. The breather is from all things that bog us down mentally and physically. The schoolwork will still be there when we’re done (much to their dismay).
  • Rest time is NOT a time to fight and argue. It’s a time to play or rest quietly (or see any of the above. Noise levels need to be minimal. If a fight erupts…well, that would definitely cross a line (it has happened a time or two) and there are repercussions. Don’t mess with the resting mama (grins).

Plan Your Own Rest Time

Why your homeschool needs a daily rest time

Does a daily rest time sound like something your family (and you) could use? Here are a few suggestions to get started.

  1. Decide what the ‘guidelines’ for rest time will be. Is it resting on beds? Playing quietly allowed?How long is the time? How loud can the kids get? Where do kids need to stay (in rooms, a playroom, etc…)?
  2. Figure out your routine. When during your day will you have rest time? Each family has a different rhythm, especially during different seasons of life. If you are making it a daily ritual, maybe you could end it by having a snack together? (There was a period of time where I made homemade cookie batter and froze it in small balls. Each day before rest time I took out 2 cookie balls per kid and popped them in the oven for a yummy treat at the end of rest time).
  3. Make it special. For younger children, it may be helpful to put together a basket of activities, or busy bags, audiobooks, and more that will keep them occupied. Some days the kids take turn cuddling up with me and just chatting over a cup of hot chocolate.
  4. Be consistent. I promise – it is worth every moment. Whether it be 30 minutes or 2 hours, a little bit of breathing room allows everyone a chance to reset, relax, and approach the rest of the day with more energy!

Laundry and housework can wait (I promise, it will still be there when you finish resting – it’s sad, but true). You though, will be in a much better mental state to tackle those piles!

Rest time in your day ultimately puts you ahead in the long run. We aren’t sprinting toward an invisible finish line – we’re in this for the long haul! And I promise – you CAN do this!


Share Your Thoughts!

Does your family have a rest time? What tips do you have to offer or what routines do you have in place?

Another post you may enjoy…10 Things to Eliminate from Your Homeschool.

10 things to eliminate from your homeschool