20 Best Tips

Baked Potato Soup Recipe

baked potato soup recipe - full of bacon, cheese, potatoes, and plenty of comfort 

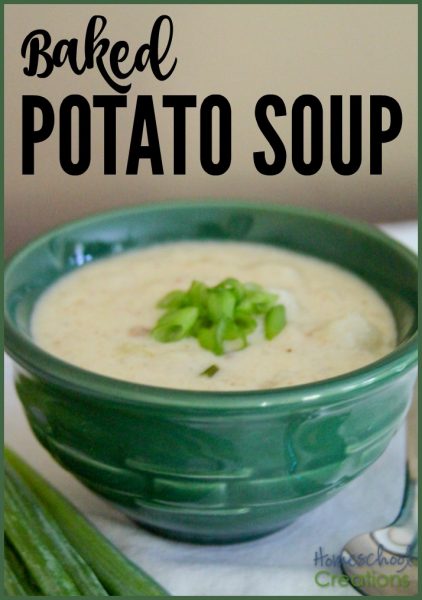
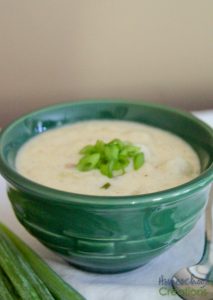
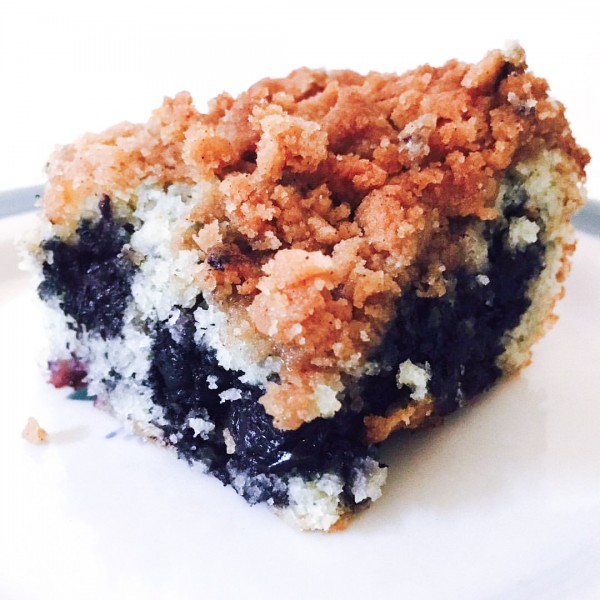
One of the things I love right now with our kids (especially our boys) is their wanting to help me cook a real meal. Not just a simple side or snack, but they want to help out making our dinners. They have their definite favorites, and one that is requested often is our Baked Potato Soup recipe. This is our go-to dish when we have a group of friends coming over because it is filling and makes a huge pot (which means leftovers if we make it just for us!). 

Baked Potato Soup recipe

Even though the weather has been warming up in our area, there was a unanimous vote for baked potato soup and I have to admit I didn’t complain about it! It’s basically a whole load of comfort food mixed up into a pot: bacon, cheese, potatoes, more bacon…what’s not to love about that? Several of you have emailed and asked for me to share our recipe, so here’s a quick card for you to print and make.

Baked Potato Soup Recipe

Baked Potato Soup
Warm and filling soup - perfect for a cold night or to share with a group of friends.
Write a review
Print
Prep Time
1 hr
Cook Time
45 min
Total Time
1 hr 45 min
Prep Time
1 hr
Cook Time
45 min
Total Time
1 hr 45 min
Ingredients
  1. 2 sticks of butter (1 cup)
  2. 1 cup flour
  3. 12 cups of milk (or more)
  4. 8 cups baked potatoes, diced
  5. 1 lb. cooked bacon, crumbled
  6. 3 cups shredded cheddar
  7. 2 cups sour cream
  8. 1 bunch of green onions, thinly sliced
  9. 1 Tbsp. salt
  10. 1 Tbsp. pepper
  11. 1 Tbsp. minced garlic
Prep
  1. Bake potatoes until done. Let cool slightly, then cut in half and scoop out middles in small chunks and put aside in bowl.
  2. Cook bacon according to directions, drain, and crumble.
  3. Slice/cut green onions, including the small bulb.
For soup
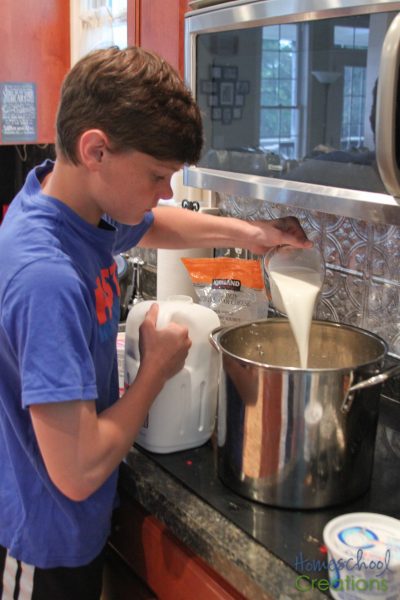
  1. While bacon and potatoes are cooking, start soup base. Melt 2 sticks of butter of medium low heat. Whisk in flour when butter is melted.
  2. Pour milk in slowly, whisking while adding. Continue stirring over medium heat (so milk doesn't scald and burn to bottom of pan).
  3. When milk has started to thicken over heat, add in sour cream, salt, pepper, green onions, and garlic.
  4. Turn to low and let soup simmer. When potatoes are ready, add them into soup along with bacon and cheese.
  5. When cheese is melted, serve with extra sour cream, green onions, and bacon.
Notes
  1. :: More bacon is always wonderful and enjoyed by everyone.
  2. :: Depending on how thick or thin you like your soup, add a little more milk. This soup is on the thicker side, but can be thinned down.
Homeschool Creations https://www.homeschoolcreations.net/

Hope your family enjoys this baked potato soup as much as ours does! (And you really can’t go wrong with bacon and garlic…or cheese…or green onions.)

Lemon Blueberry Coffee Cake

lemon blueberry coffee cake recipe from HomeschoolCreations.net - yummy breakfast treat!

One of the best parts of our children getting older is the chance they have to step into the kitchen and take over some of the cooking duties. While we are working toward independence with all the kids (I firmly believe they need to have a strong means of keeping their bellies full with homemade food once they leave home), they are having much fun choosing recipes and serving our family by putting together a breakfast once a week.

A current favorite is our Lemon Blueberry Coffee Cake recipe. With a yummy crumble topping (my personal favorite) to the combination of blueberries with a little bit of lemon flavor – oh my goodness. Definitely a tasty way to start the day!  Below you’ll find our adapted recipe along with some alternate suggestions for the lemon addition.

Lemon Blueberry Coffee Cake Recipe

adapted from Mennonite Country-Style Recipes 

Lemon Blueberry Coffee Cake
Serves 9
With a yummy crumble topping to the combination of blueberries with a little bit of lemon flavor - oh my goodness. Definitely a tasty way to start the day!
Write a review
Print
Prep Time
15 min
Cook Time
30 min
Total Time
45 min
Prep Time
15 min
Cook Time
30 min
Total Time
45 min
For the cake
  1. 1 egg
  2. 2/3 cup sugar
  3. 1/2 cup coconut oil
  4. 1 tsp. vanilla
  5. 6 drops lemon vitality oil OR 1 Tbsp. lemon zest
  6. 1 1/2 cups flour
  7. 2 tsp. baking powder
  8. 1/2 tsp. salt
  9. 1/2 cup milk
  10. 1 1/2 cups blueberries (fresh) - if frozen, thaw and drain well
For the topping
  1. 1/2 cup brown sugar
  2. 1/3 cup flour
  3. 1/2 tsp. cinnamon
  4. 1/4 cup (4 Tbsp) melted butter
Instructions
  1. Beat together egg and sugar until light and fluffy. Add in oil, vanilla, and lemon.
  2. Sift together dry ingredients and add to egg mixture, alternating with milk until all are mixed.
  3. Gently fold in blueberries, careful not to overstir (batter will become tinted blue if stirred too much).
  4. Pour into a greased 9x9 baking dish.
  5. Combing topping ingredients and sprinkle over the top of the batter.
  6. Bake at 350 for 25-30 minutes. Best if served warm!
Notes
  1. © Homeschool Creations. All images & content are copyright protected. Please do not use my images without prior permission. If you would like to republish this recipe, please re-write the recipe in your own words and link back to this post for the recipe.
Homeschool Creations https://www.homeschoolcreations.net/

* Lemon Vitality oil can be purchased here. You can also use lemon zest in place of lemon oil.

Need Meal Planning Help? 

free-weekly-meal-planner-from-Homeschool-Creations-with-room-for-3-daily-meals-and-snacks-as-w.png

If planning meals is overwhelming, check out this fun and helpful Weekly Meal Planner to get you started and planning in less than 15 minutes! 

Maple Syrup Snow Candy Recipe (Wax on Snow)

Maple syrup snow candy recipe

Well then. The past few days we managed to get a whole heap of snow. And by a heap, I mean pushing the 2 foot mark. We’ve done all the typical obligatory snow activities: snow angels, snow forts, snowball fights, shoveling (that last one may not be the biggest hit, but hey).

Our in-laws recently delivered a gallon of maple syrup, and my husband grew up enjoying maple syrup candy (aka “Wax on Snow” as it is called up there!) during the winter season (when you grow up in upstate New York there is a lot of snow to be had!). We called his mom to get the instructions on how to make it and – SO SIMPLE (and yummy)!

Maple Syrup Snow Candy Recipe

You’ll only need to gather a few things to make the maple syrup snow candy recipe. We definitely recommend using pure maple syrup – because YUM! It hasn’t been tested using other syrup.

  • 1 cup maple syrup
  • a saucepan
  • candy thermometer
  • big bowl of packed snow
  • wax paper

Directions:

Maple syrup snow candy recipe from Homeschool Creations

  1. Bring maple syrup to a boil over medium high heat in a medium saucepan.
  2. Continue stirring until temperature reaches 235 degrees. Syrup will be thickened slightly.
  3. Remove pan from heat.
  4. Pack snow well in a large bowl and test a small amount of syrup by drizzling over snow. If it doesn’t sink in too far, it is ready to pour!
  5. Slowly drizzle the heated maple syrup over snow – have fun making designs. The thinner your pour the more brittle it will be.
  6. Once cooled down and hardened, removed from snow and place on wax paper.
  7. Enjoy!

Maple syrup snow candy recipe from Homeschool Creations

Note: We tried bringing it to temperature using a double boiler, but ended up pouring it into a saucepan and heating it directly over the heat that way.

Graham Toffee Crunch Treats Recipe

graham toffee crunch treats recipe from Homeschool Creations copy

One of the Christmas recipes we’ve really enjoyed this year is Graham Toffee Crunch Treats. These are a bit of a twist on an old recipe, using graham crackers (something we had an abundance of from camping) in place of saltine crackers. We also added in an extra sprinkle of some toffee yumminess to the top and the kids have been gobbling it up!

With just a few days left before Christmas, this is a super quick and easy recipe to make, especially if you need a last minute gift to drop off for a neighbor or a yummy dish for a party. You’ll have nothing but tiny crumbs left!

Graham Toffee Crunch Treats

Graham Toffee Crunch Treats-12

Ingredients

  • 2 sleeves of graham crackers
  • 1 cup butter
  • 1 cup brown sugar
  • 2 cups semi-sweet chocolate chips
  • 1/2 bag Heath toffee pieces

Directions

  1. Preheat oven to 325°F.
  2. Line a jelly roll pan with parchment paper.
  3. Lay the graham crackers on the jelly roll pan, filling in around the edges as best as you can. Making them neat is pretty to start, but in the end it won’t matter.
  4. Melt the butter and sugar together in a pot over medium heat, stirring continually. Once the butter has completely melted, bring the mixture to a boil for 2-3 minutes, continuing stirring.
  5. Remove from heat and pour evenly over the graham crackers. Spread over crackers using a small spatula.
  6. Bake for 6-8 minutes. Remove from oven and sprinkle with chocolate chips while still hot.
  7. Let the chocolate chips melt for a few minutes and then spread the chocolate over the top with a spatula.
  8. Sprinkle evenly with 1/2 bag of the toffee bits.
  9. Place in the freezer for 30 minutes to cool. Break apart into pieces and store in an airtight container.
    Note: you can also use saltine crackers in place of the graham crackers and it is equally as yummy!

      Other Recipes You May Enjoy

      Peppermint Bark Recipe


      Gluten Free Cookie Dough Balls

      Gluten Free Cookie Dough Ball Recipe

      gluten free cookie dough ball recipe from Homeschool Creations

      While they may not be the most stunning looking, let me tell you, these gluten free cookie dough balls didn’t last long once they made their appearance at a youth group Christmas party. Granted, we are talking about teens and their eating pretty much anything put in front of them, but the two I tried were delicious and we’ve only heard wonderful words about them. (And the teens didn’t care that the balls weren’t ‘dipped’ perfectly).

      Although our family isn’t gluten free, we have several friends in our co-op and youth group that are, so we try to make snacks everyone can enjoy. Some gluten-free batters taste great in their cooked state, but let’s just say there are a few brands of mixes that are nasty in their raw form. After searching through a few recipes, I found a blend from this site and played with the measurements of the flours a bit to come up with a gluten-free dough that is very tasty when raw.

      And people, cookie dough is one of those things that should be eaten raw every now and then!

      Before you get all upset with me about using eggs with cookie dough, this recipe (either gluten-free or not) does not use any eggs and still tastes just as yummy since there is no baking involved. It’s a win-win for all!

      Typically we use this gluten-free flour blend we have purchased at Costco in the past, but they don’t always carry it. We are blessed to have a well-stocked bulk food store that sells many of the flours we need in a discounted quantity and have also found them in the specialty area of our supermarket as well. I’ve included both the gluten free version and a non-gluten option in case you would like to make them as well.


      Gluten Free Cookie Dough Ball Recipe

      gluten free cookie dough balls dipped in chocolate - no egg version and so yummy

      Makes 4 dozen balls (or sort-of ball shapes, depending on your patience)

      Ingredients

      • 1.5 cups white rice flour
      • 1/2 cup tapioca flour (or tapioca starch)
      • 1/4 cup potato starch
      • (can use 2 1/4 cup flour in place of above if not gluten free)
      • 2 sticks of butter (1 cup)
      • 3/4 cup brown sugar
      • 3/4 cup white sugar
      • 1 tsp vanilla
      • 1/4 tsp salt
      • 1 bag mini chocolate chips
      • 2 cups chocolate chips + 1tsp coconut oil (set aside)
      • Note: if you’d prefer to use a pre-mixed gluten free blend, we also recommend this one. You can also use a fancier chocolate for dipping for a ‘smoother’ look, but I’m not a food blogger and my kids don’t care.

      Directions

      1. Mix rice flour, tapioca flour, and potato starch together in a small bowl.
      2. Cream together butter and sugars in a separate bowl. Add in vanilla and salt.
      3. Slowly mix in gluten free flour blend. You may need to use your hands at the end since it seems a little drier. It will stick together though.
      4. Mix in mini chocolate chips. From into 48 1” balls using a small cookie scoop and place on cookie sheet. Place in freezer for about 30 minutes to firm up.
      5. Using a double boiler, melt the 2 cups of chocolate chips with 1 tsp of coconut oil and when melted, dip each ball into the chocolate mix, setting on parchment paper when covered.
      6. Place back in freezer for about 30 minutes to firm up again. Remove from parchment paper and store in fridge to keep cool.
      7. Enjoy!

      One of my friends whose son is gluten free HIGHLY recommends the book Cooking for Isaiah and the flour blends and recipes included in that book. Here are a few items that we use and love…

      Peppermint Bark Recipe – a Christmas Favorite!

      homemade peppermint bark recipe using essential oils - a yummy holiday treat

      One of the things that I most look forward to during the holiday baking and cooking season is Peppermint Bark. Left to my own devices, it is highly probable that I could consume massive quantities of it because let’s face it – chocolate + peppermint = yumminess. This peppermint bark recipe is one that has been tried, tested, and used for years in our house!

      The peppermint bark has also been fun to make in large quantities and gift some to friends and family to share the love. The fact that we also have an excuse to lick the chocolate spatulas when we are done has no bearing on the matter.

      Although recipes are not a weekly normal around the blog, we are enjoying some time in the kitchen over the next few weeks of December and getting a little more ‘practical’ learning on the table, so to speak. I’m not hearing any complaints from the kids, so I think we’ll keep it going! While we’re cooking, we figured we might as well share the yumminess (and the recipe) with you all as well!

      Peppermint Bark Recipe

      our favorite homemade peppermint bark recipe - easy and a great gift idea for the holidays

      (make 1.5  pounds)

      • 24 oz. semi-sweet or dark chocolate chips (2 bags of chocolate chips)
      • 16 oz. white chocolate squares (3 boxes or 1.5 bags chips)
      • 8 candy canes, crushed
      • 4-5 drops of Peppermint Vitality essential oil (we use Young Living oils). You can also use 1 tsp. of peppermint extract, but we’ve found the essential oil does so much better!
      • 1-2 tsp. of coconut oil (optional)
        Note: I prefer using darker chocolate if possible – it’s one of my favorites. While semi-sweet is what we typically use, if I can find a darker chocolate, I use that too!

      Making Peppermint Bark

      homemade peppermint bark recipe using essential oils-5

      You’ll need a jelly roll pan (these are our favorite ones) to make this peppermint bark recipe. You can use a smaller cookie sheet for a thicker style bark (yum) as well.

      1. Line your jelly roll pan with parchment paper.
      2. Melt the semi-sweet chocolate chips using a double boiler. It’s harder to get the right consistency melting them in the microwave. The chocolate tends to get clumpy and hard if you overheat or do something wrong.
      3. Stir in 4-5 drops of peppermint essential oil (trust me – so good!).
      4. If needed, add a 1 tsp. of coconut oil to the melted chocolate to get a smoother consistency. You don’t want to add too much more, because it makes the chocolate a little softer, and when it is at room temperature it isn’t the right texture.
      5. Once melted, pour evenly over the bottom of the pan and spread with a  non-stick spatula. Invite a child to lick it clean – they will happily oblige.
      6. Pop the pan into the freezer to cool it down quickly. Wait about 30 minutes.
      7. Crush the candy canes into small pieces. I use a metal strainer to get sift the powder out of the mix (and we use it in hot chocolate). Set aside.
      8. Melt the white chocolate over the double boiler, adding a small amount of coconut oil if needed. As soon as it reaches the right consistency, pull the jelly roll pan out of the freezer and carefully pour it over the dark chocolate and spread it with a different spatula (since your kids obviously have been licking the last one.
      9. Sprinkle the crushed candy canes over top of the white chocolate and gently press it into the white chocolate. Pop it back into the freezer for a bit to harden.
      10. Break the peppermint bark apart into pieces – no size is correct. Enjoy!