20 Best Tips

‘Bb’ is for Bee {Craft}

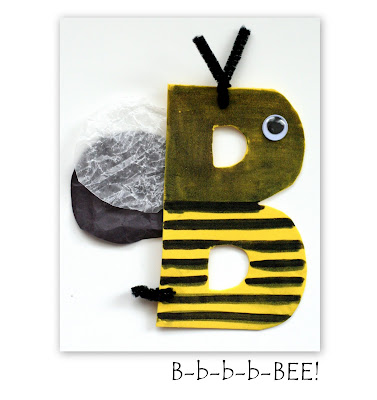
I tried to find something fun to represent the letter ‘Bb’ for our preschool class and have to say that I am in love with this little bee.

I have to warn you though ~ if you use a foam sheet and a marker, the smudge factor will be involved. Fingertips will be black and marker color will spread like wildfire.

But the result is just so cute!! {dontcha think?}

What You’ll Need:

  • Yellow foam sheet or construction paper
  • Black sharpie or marker
  • Wax paper
  • Googly eye
  • Black pipe cleaner
  • Glue

How to make the ‘B’ Bee:

  1. Cut an uppercase ‘B’ out of the foam sheet or construction paper. I used a foam sheet that was about 4″ x 5″ in size.
  2. Cut out two circles from the wax paper to use as wings for your bee. {I used one black, one wax paper so the wings would show up for the pictures}.
  3. Cut the pipecleaner into two pieces ~ one should be 1/3 of the length of the pipecleaner, the other 2/3 of the length.
  4. Poke the small pipecleaner through the bottom base of the ‘B’ to use as a ‘stinger’.
  5. Poke the longer pipecleaner through the upper part of the ‘B’ to use as the bee’s antennae.
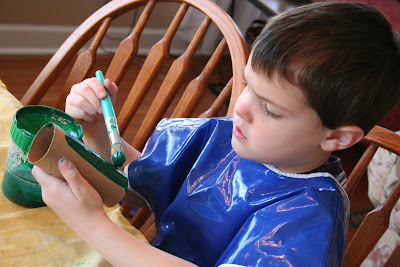
  6. Have your child draw stripes on the B using the marker.
  7. Glue on the googly eye and wings.

Photobucket

Fourth of July Resources

Fourth of July sorta snuck up on me. It wasn’t until I did this Friend Makin’ Monday post that I realized we’ve done little over the years for the fourth. Since we have no pictures at all to show for any 4th of July activities, I figured this would be a good year to start. I also posted some Fourth of July crafts {a cute hat and ‘sparkler’} that we made today over on our family blog, No Ordinary Moments, so stop by and check them out

If I get really ambitious, we might even do a little unit study, but in the meantime {and since one of you asked}, here are some resources for you to use for your own Independence Day study.

Heritage House Press
~ Free Mini Unit {act quick!!} all about the 4th! All you have to do is sign up for their newsletter. The link is on the page.

DLTK Independence Day crafts
~ some coloring pages, printables and great crafts

F is for Flag written by Shannon ~ great mini-unit for preschoolers!

Independence Day unit ~ notes and lesson ideas {grades 2-4}

First School patriotic mini-unit
~ geared toward preschoolers with craft ideas, printables and links to online activities.

Enchanted Learning ~ July 4th activity book

Create your own fireworks ~ link from PBS – need flash to do this one

Lapbook Lessons ~ Free 4th of July lapbook

Family Fun ~ they always have some creative and fun ideas for crafts, food and more!

Perkins Home ~ a little unit all about the 4th!

Crafty Crow ~ there are a TON of 4th crafts, recipes and activities here.

Road to Revolution {PBS} ~ teacher resources, games, and more based on the Liberty series

Tour the house of Betsy Ross
{virtual tour}

Listen to some patriotic songs

Have fun looking through the sites ~ and hope some of them help you out!

Photobucket

Making Sea Fans and Coral Reefs

Otherwise known as the Great Ocean Biome Diorama.

Say that ten times fast and you’ll have a great sum-up of my week.

Laurianna has been studying about different biomes and she had to choose one biome and make a diorama of it ~ she chose saltwater.

Rather than having everything be flat and just a cut-out we decided to have a little fun and thought you might like to see how to make a few quick and simple 3-D underwater specimens of your own.

What You’ll need:

~ needlepoint canvas
~ orange paint & a brush {or color you choose to make your sea fan}
~ orange {or other color} pipe cleaner
~ scissors
~ newspaper.

Make the Sea Fan:

1. Cut the needlepoint canvas in the shape that you would like your sea fan to be (a tree shape). The shape doesn’t have to be exact – they’re all different. :)

2. Paint the canvas orange {use the newspaper to protect your surface} and let it dry.

3. When the canvas is dry, use the pipe cleaner to make ‘branches’ and a ‘trunk’ on the canvas.

What You’ll Need:

~ playdough or modeling clay
~ paint and a paint brush
~ radiatore pasta {small ruffled and ridged shaped pasta}
~ newspaper

Make the Coral Reef:

1. Form a ball with your playdough or modeling clay and flatten it just a little bit. Size will vary based on either your diorama size or what you are making it for. Our balls were about 2 inches in diameter.

2. Press the pasta into the clay to create a ‘brain-like’ pattern.

3. Paint your coral mass and let it dry!


{A few other notes}

~ The shark ‘swims’ across the sea. He is glued to a popsicle stick and travels along a slit at the top of the box.

~ We used blue tissue paper as our water and half a sheet of sandpaper as our ocean floor.

~ Laurianna drew fish, crabs, jellyfish and the shark to decorate her diorama. The fish are hanging by a clear sewing thread from the top of the box. We also used shells and coral that we found on the beach to decorate it a little more.

Photobucket

How to Make a Toilet Paper Roll Train

train craft made with toilet paper rolls from Homeschool Creations - great project for the letter Tt unit

This last week our preschool time focused on the letter ‘T’ and that included making a little train as our craft. It was too cute to just post a picture of and not give directions to make your own. {grins} A friend’s son made something similar and so I tweaked it to make it work even better. This project would require more adult help for younger kids (i.e. 2-4) ~ depending on how much cutting and pasting they are able to do.

You can make your train as long {or as short} as you’d like. We decided on four colors, so we had four cars on our train. Be sure to ask your child which is first and last. I forgot that the caboose is red…and had a four-year-old that was non-too-happy when he saw I made it the engine.

Oops.

That said, here’s the scoop on making your own little engine and rail cars.

What You’ll Need:

  • Four or more toilet paper rolls {you can get these extremely fast if you leave your two-year-old alone in the bathroom for about 4 minutes or so}
  • a clothespin
  • a cotton ball
  • paper clips {colorful ones are even more fun}
  • black construction paper
  • a hole punch
  • glue stick
  • scissors
  • various colors of paint
  • a LARGE smock and painting tarp {i.e. protection for anyone surrounded by a paint-weilding preschooler}

How to make it:


    1. Have your child paint each of the toilet paper tubes. Set them aside to dry.
    2. Paint the clothespin black. Set aside to dry.
    3. Trace 4 wheels for each toilet paper tube that you decide to add to your train. I traced around the end of a toilet paper tube. You can fit about 20 circles on a sheet of construction paper. Have your child cut some {or all}of them out.
    4. Use a black marker {or some black paint} to color your cotton ball to make it look like the smoke/steam coming out of the train.
    5. When the paint is dry on the tubes, lay them all on the table to find how they best ‘rest’. Glue 4 wheels onto each train car.


    1. Line up the cars in the order you want them to be linked. Punch a hole on the bottoms of each car {front and back except for the engine and caboose} to link each train car together.
    2. Link the train cars together using paperclips.


  1. Punch two holes (overlapping) on the front top of the engine.
  2. Insert the clothespin into the two holes on the top of the engine.
  3. Glue the cotton ball to the top of the clothespin and pull/stretch it out to make it look like the smoke is traveling behind the train.

Photobucket

Artistic Pursuits

Simple crafts and ready-to-go/print ideas have essentially been our “art time” over the last few years. My extent of art knowledge and styles is minimal (at best). I might be able to identify some very famous paintings, but definitely not specific styles or the masters of art history.

ARTistic Pursuits has a complete K-12 art curriculum written for homeschoolers by homeschoolers. They provide art instruction in areas such as visual art, art history, modern art, the elements of art, and color and composition. Their curriculum books show student examples of the projects along with detailed lesson plans for the projects. Each book is also non-consumable, so it can be used over and over in the years to come with each child in your family!

We received ARTistic Pursuits, Grade K-3, Book Two, Stories of Artists and Their Art ($42.95) to review and seeing it person has made such a difference! I had heard of ARTistic Pursuits before but never looked into it further – and I wish I had. I love it! The Ellis’ have put an amazing amount of time, research, and effort into developing a comprehensive and quality curriculum for homeschoolers.

Some of the features of ARTistic Pursuits, Grade K-3, Book 2, Stories of Artists and Their Art:

  • geared to the student – there is no teacher preparation needed (other than gathering materials)
  • organized and easy to understand
  • colorful and engaging for kids
  • contains biographies and works of art from 16 artists within the 13th to 18th centuries
  • provides 32 projects in the areas of painting, drawing, printmaking, modeling/carving, and mixed media

A quick look inside some of the pages from Book Two:

Because we’ve been studying castles and knights, the first few lessons in this book were great for us to use. We read about Giovanni Cimabue (1240-1302) and did several projects including a watercolor painting and also “gold leaf”. Both used easy to find supplies and the girls were able to follow the project directions without any assistance from me.

I’ve read through the artist biographies and learned a lot myself! ARTistic Pursuits, Grade K-3, Book 2, Stories of Artists and Their Art features various works of art and draws the students attention to details in the paintings then explains the importance of what the art portrays for that artist or time in history. Art history periods taught include Gothic, Renaissance, Northern Renaissance, Mannerist, Baroque, Rococo, Romantic, and Realist.

The book also contains a materials list for the art supplies needed for the various projects, grouped together for easy reference, so you know what is needed for each “class time”. Supplies are available in discounted bundles through another website or can be purchased at your local craft store. Purchasing the art supplies is the only prep you need to do for the lessons – it really is that simple!

ARTistic Pursuits has taken a subject that can be very intimidating for parents (and often overlooked as a result) and made it incredibly easy to teach by providing an excellent curriculum for homeschooling families.

Click on the Homeschool Crew banner to read reviews on different levels
of this product and other products available from Artistic Pursuits.

Photobucket

Core Learning and Crayola Art Studio

If your kids love the computer as much as mine do (begging would be an appropriate word to insert here) and they happen to be a little crazy about art, then you might want to look into purchasing Core Learning’s new Crayola Art Studio ($24.95). It was just released in November and is a wonderful program for kids to create their own works of art. The program is based on the beginner levels of the corefx digital art software.

My overall impression of this product that it is AMAZING (and fun to boot)! Once I installed it on our computer, I had very little to do to show the girls how to use it. There is a quick video tour and the girls (ages 6 & 7) and even Zachary (with the girl’s help) are having far too much fun using it. You can download a free trial of the software to try out for yourself, but here are few of the features of the program:

  • realistic art tools to use – crayons, markers, paint, watercolors, chalk, oils…all available in a variety of colors and strokes.
  • color palettes that allow you to mix your own colors or choose from a pre-set range of colors
  • undo and mirror image features (rather handy for the kids!)
  • hundreds of art images that can be edited and manipulated while kids are learning how to edit pictures
  • ability to import your own pictures to edit and have fun with

If you have older children, the Corefx program ($59.95) allows you to do even more with graphics and drawing and even animation. Corefx includes many more graphics and art mediums and also has three skill levels.

In addition to art, Core Learning also offers programs for math, health, language, and critical thinking. We’ve been using the Health for Kids Series ($29.95) and our girls are having a lot of fun exploring the insides of the human body. The program makes it extremely fun for kids to learn about different parts of the human body through animation: the tongue, larynx, airways, mouth, epiglottis and more.

Core Learning also has a special page that lists current promotions available. Be sure to check out the Homeschool Crew blog for more on Core Learning!