

- Like
- Digg
- Del
- Tumblr
- VKontakte
- Buffer
- Love This
- Odnoklassniki
- Meneame
- Blogger
- Amazon
- Yahoo Mail
- Gmail
- AOL
- Newsvine
- HackerNews
- Evernote
- MySpace
- Mail.ru
- Viadeo
- Line
- Comments
- Yummly
- SMS
- Viber
- Telegram
- Subscribe
- Skype
- Facebook Messenger
- Kakao
- LiveJournal
- Yammer
- Edgar
- Fintel
- Mix
- Instapaper
- Copy Link

Last year we first started using workboxes and for the most part, we followed along the way it was supposed to go ~ except we used workfolders rather than workboxes. This year, after talking to the girls a bit, we revamped our system to make it work better for us. Ginger-Snap-Shots did this very thing last year with her girls with a little bit of a different twist.
This year, instead of using numbers for both the girls and Zachary, we’re switching to a more visual system. This way the kids can see what is expected of them each day. We also ditched the number strips because it was getting plain ol’ tedious for me to pull, switch, and sort the numbers everyday.
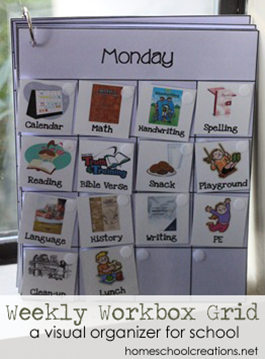
The Workbox Weekly Grid Layout
Our new workbox system will have the entire week laid out ahead of time. I have planned out what days we’ll be covering certain subjects and can lay out each child’s week in a short amount of time. Their new card system is closer to the size of an 8 1/2 x 11 sheet of paper and each day has it’s own sheet.
Here’s a peek at Laurianna’s Weekly Workbox Grid so you can get a visual of what I am describing:

If you look closely, you’ll notice that the velcro that attaches the workbox activity card is actually on the corner of the card {I used 3/8” sized velcro coins}. The front of each of the cards has another 3/8’” velcro dot in the top right corner. When the kids are done with that subject/activity, they can simply flip the card over {see the picture below}.

Here’s a look at the entire week laid out as individual days. It is a lot of tags, BUT I don’t have to keep resticking them since they get flipped over. :) Friday is always skimpy since that’s the day that we have co-op and end up playing with friends.

The cards for each day have all been put together on a jump ring and they hang on the wall from that ring. Each child has their own special color of the Weekly Workbox Grid {because you all know that I color-code my kids}. The first page of the workbox weekly grid is actually their chore and daily ‘to do’ list ~ click here to see our chore system. :)

Using the Workfolders
We are still using the workfolders this year, and they will hold the worksheets and books that the kids are using for the entire week. Instead of having numbers on each folder this year, each page will have a subject card showing what should be in that pocket.
Here’s a little peek inside a folder to show you how we’re tying the workfolders into this system.

In the left pocket are Laurianna’s math cd-roms along with some scratch paper to do her math work. In the right hand pocket is her spelling progress chart. You can see a ‘Mom’s help’ tag on the pocket too ~ showing that she is going to need my help with this subject. Our folders have a total of 12 pockets, so the remaining pockets have subject tags for language, writing, history, science, Bible, handwriting, reading, etc…
Laurianna has been excited about this because she can actually work ahead in her school week if she would like to! If she wants to do three math lessons in one day, she can do that and then flip over those cards on the upcoming days.
Big and Bulky Items

We’re still using the same system for ‘big and bulky’ items that we did last year. Each kiddo has their own special big bin on the bottom of Kaleb’s workbox station. He’ll use the top 8 bins and the bottom four are for bigger items like puzzles, leapsters, games, etc… I’ll explain more about Kaleb’s workboxes later in a preschool post.
Yes, it’s a lot of laminating on my part. And lots of tiny velcro dots. BUT in the long run, this is the system that the kids and I have talked about and will work best for us. Sometimes keeping my sanity is more important {grins}. Having the cards all in one place and not scattered over our table or everyone’s cards in a bucket helps me out immensely. Since our schedule doesn’t change much from week to week, I’m able to quickly flip cards and re-stock their workfolders in one sitting.
I’ve included some additional links for you all below to help you out if you are using workboxes or want to use a system similar to mine. :) If you have a question, please feel free to leave a comment with your email address so that I can answer you!! I’m sure I’ll be posting updates about our system to further answer questions, but this is it in a nutshell!
Workbox Resources
~ Workbox Weekly Grid ~ pdf download of the pages I put together for our kids including pink, purple, blue, green and white pages for Monday through Friday.
~ Jump rings – essentially these are key rings that open up easily so you can add to them. We use them in the top corner of our Weekly Grid so we can flip through the days easily.
~ Workbox Picture Activity Cards ~ Overall, there are a total of 32 picture cards, 24 minute cards, and 4 blank cards for you.
~ Preschool Number Cards ~ Number cards with some fun characters {if you are using the traditional workbox system}
~ Scotch laminator ~ this is the laminator I use and until July 31, 2010 there is a $20 rebate when you buy the laminator and a 50 pack of laminating pouches. I love mine so much I bought a spare {sad, but true}.
~ Workbox system using number strips and workfolders {our system last year}
~ Velcro in BULK. I purchased the 3/8” velcro dots from Textol Systems but have also found larger coins at even better prices from Feiner Supply {and they have free shipping this month!}
~ Lots of great workbox links, ideas and ways to adjust the workbox system.


 The printables shared on this site are FREE of charge unless otherwise noted, and you are welcome to download them for your personal and/or classroom use only. However, free or purchased printables are NOT to be reproduced, hosted, sold, shared, or stored on any other website or electronic retrieval system (such as Scribd or Google docs). My printables are copyright protected and I appreciate your help in keeping them that way.
If you download and use some of my printables and then blog about them, please provide a link back to my blog and let me know - I'd love to see how you are using them! Please be sure to link to the blog post or web page and not directly to the file itself. Thank you!
The printables shared on this site are FREE of charge unless otherwise noted, and you are welcome to download them for your personal and/or classroom use only. However, free or purchased printables are NOT to be reproduced, hosted, sold, shared, or stored on any other website or electronic retrieval system (such as Scribd or Google docs). My printables are copyright protected and I appreciate your help in keeping them that way.
If you download and use some of my printables and then blog about them, please provide a link back to my blog and let me know - I'd love to see how you are using them! Please be sure to link to the blog post or web page and not directly to the file itself. Thank you!
I have a question on using the Scotch Thermal Laminator with this project. I just bought one and hope to pretty much copy your workboxes here :) and was wondering when you do the activity cards and numbers…. do you cut them apart and laminate separately? Or just laminate the whole sheet and then trim? My husband thinks that I have to cut first and laminate one by one… I’m praying that’s not the case! Thank you for any thoughts you have!
I laminated the entire sheet first and then cut them apart individually. I’ve only had a few pieces ever start to peel back at the corners and some of that is after a few years of use! I’m all for keeping it as simple as possible!! :) Hope that helps!
YES, and btw Thank you SO much for responding today because I am going to hopefully print my cards tonight and get them laminated. Your website is fabulous and I have been perusing it every day for the last few weeks. Thank you so much for your quick response and all these wonderful resources and ideas!
so glad I can help! :)
I laminated just as you said, and it has worked perfectly! (I’m now laminating everything I can get my hands on). :)
Thanks again, I’m really looking forward to starting this system with my son. I really think he’ll love the independence it bring (he’s 4) and all the boxes full of things to do. He’s very much a kid who enjoys knowing what’s coming next, so I think he’ll love this!@1d3c37d3a84e3f5c6f8cf8a0acb643ae:disqus
Yay!! Have fun!!
Thank you for this post. Im trying to start this system this year but so confused. I havent read sues book nor do i want to spend the money right now. My husbands been unemployed since aug last year – and JUST got a job, so i guess im being tight haha.. but any how, with the labels you are using, on your kids daily workcharts… is there an identical label inside their workfolders?
and how do your kids know “what to complete” each day, if the books are just left in the folders. Do you mark the pages?.. im so confused lol. email me if thats easier drea[at]dreawood.com id appreciate it!
I’m in Tanzania at the moment and can’t respond fully, so if you are willing to wait a few weeks, I can get back to you later. :)
Andrea ~
Sorry it’s taken me a bit to get back to you. :) To answer your questions…
There is a matching label on one of the pockets in our folders. Sue’s system uses small clear plastic boxes and numbers from 1-12, but that wasn’t working for us. I have set up a pocket for each of the subjects we use and the tags on the chart match those {you can see an image here where the label is at the bottom of the pocket}:
I have a full webpage where I break it all down here: http://homeschoolcreations.com/Workboxes.html
As far as knowing what to complete each day, there are some subjects that the kids work on with me {they have a tag that says ‘work with mom’} and some of the kids work more 1:1 with me when they are younger, so we go over what they need to complete. As the kids get older, they are typically familiar with the curriculum that we use, so they know how much to complete {usually a page a day or a lesson a day}. I also created a daily assignment sheet where they can track what they need to do {or have done}:
https://www.homeschoolcreations.net/2011/10/daily-assignment-sheets-free-printables/
Our kids have loved this system because they can work ahead if they
would like. Once the work in that pocket is done, they are finished for
the week.
Hope that helps you some. :)
I was able to borrow the book from Amazon through my Prime membership. I’m not sure if that is an option for you but I thought I would mention it in case you would like to go the route.
thanks for sharing, Michelle!! That’s great to know!
I have been looking for folders that have the storage area in the front/ Where do you get these? Thanks
Here are a few links for some similar folders:
http://amzn.to/Jz20pZ
http://amzn.to/J3Bd8i
Hope those help!
Thank you! I was thinking the same thing. :)
Thanks for sharing your wonderful idea. When I get a laminator I am going to laminate everything in site. I am definitely going to adapt this for my 12 year old who walks around with his head in the clouds most of the time.
We are starting homeschooling “officially” in the fall and look forward to incorporating some of your ideas!
Hi Jolanthe, I have looked online at the link for the velcoin dots. Did you purchase the whole roll of both hook and loop? Or were you able to buy a smaller quantity? I don’t really need 3,000 and that is their smallest quantity. Any suggestions? We are starting the work box system and I have downloaded, printed, cut, laminated and cut all of your printables. Just can’t seem to find these dots; to get the last piece of the puzzle to work out. Thanks for everything!!
Walmart sells them in smaller quantities in the sewing area, but by the time I purchased 2 or 3 boxes of theirs, I should have bought them in bulk because it would have been less. Gotta love it! And yes…I did purchase a full roll of hook and one of loop. I ended up finding a friend locally that I split the roll with ~ and we still have velcro left over {grins}.
Where did you find your shelving for your workboxes for the more bulky items? I’m sure this question has been asked, but I cannot find it. Thank you so much! :)
I think initially we picked it up at Costco. I’ve seen them before at stores like Target though too. :) We aren’t using those anymore because our homeschool space has changed over the last few years, but they were very handy. :)
Hi Jolanthe, love your site it has very helpful information. I was wondering if you could tell me if the workbox printables were editable. Or if you have a file that allows editing to the workbox cards. Thank you.
No, I’m sorry. I haven’t had the time to edit them to do that yet.
Do you have any idea why the first sheet (page two would print in the color purple? I’m a little upset because it wasted my ink! It shows up white on the screen, but it printed purple. Any help is appreciated!
I tried the last set and found it was the blank one. It’s just so weird that the color didn’t show up on the screen! Huh. Well, anyway, thanks for the grid and printables!
There are four different colors and a white page: purple, pink, blue, and green. The pages are a very pale color because they end up printing our darker. It may be that your screen colors didn’t show because of the light/dark settings. I’m sorry for the confusion. :)
I was looking around for visual schedules for my son to use (he’s autistic) and came across this post. I LOVE the way you have this set up! We aren’t homeschooling but I think this is a great method. Riley uses a workbox/workbook style method at school to help him keep track of his work and what they expect him to accomplish in a day. It’s nice to see it laid out like this so that I can put something similar together to use with the stuff we work on at home. Thanks! (Especially for having the cards already illustrated!)
You are most welcome – hope they are a big help to you. Let me know if you have any questions. :)
Hi and thank you for all you provide. Im thinking of using the workbox grid, only, how do I paste into the spare blank boxes my own pictures and typing to match yours for the things we do?
If there are specific ones you are looking for, let me know. I may already have them.
I would use the german flag for german, and Ive found more fitted pics for music and dinner. How had you planned we could use the blank squares?
Many thanks
How do you handle textbooks? I like the idea of a folder but we don’t use a lot of worksheets.
So…if we do math 4 days a week would I need to make 4 copies of the workbox printables and then an extra copy to put on the box/folder? And then I would have to do the same for each of my other children? I just want to make sure I’m understanding this correctly before I do all the printing and laminating. It seems like a lot!
Yes – if you mean the tags, then yes. If we do a subject twice a week, there are only two tags and then one for the pocket in the folder.
OK, thanks!
Oh my goodness. I love this!! I still have a couple years to really decide if I’m going to homeschool or not. This system makes me lean more towards homeschooling later. I thrive on organization so this is just great! Thank you! So glad I found your site.