20 Best Tips

Preschool Corner: Robin Lapbook

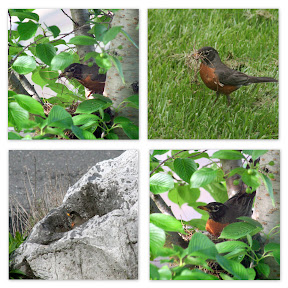
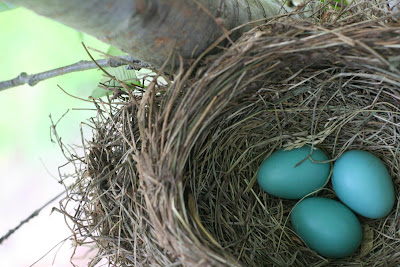
We had a little robin who decided to build a nest right in front of our house and we were able to watch the entire process. The kids were thrilled to discover that she had laid three eggs.

Zachary was the one who alerted us to the fact there were eggs in the nest ~ after he reached up, stuck his hand in the next one morning and felt the eggs.

We had a little discussion about leaving bird’s nests alone. Yes, we did.

That seemed like a great time to avoid those last few pesky letters of the alphabet that are hanging over my head and use the time to learn as much as we could about robins. It would be a shame to waste a perfectly good learning opportunity, don’t you think?

Drawing a picture of a robin

I posted about the robin lapbooks that the girls put together along with some great links, but wanted to do a separate post for Zachary’s lapbook, since it was a little different and more ‘directed’ by him. He was so excited to have school time along with the girls and feels like he is really doing school right now. It’s so funny to watch him.

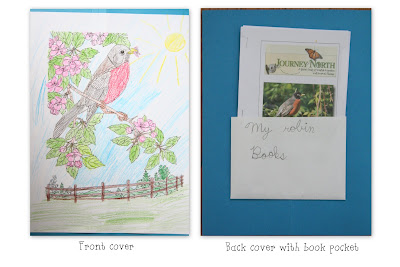
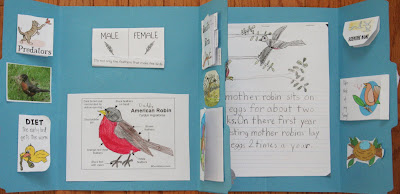
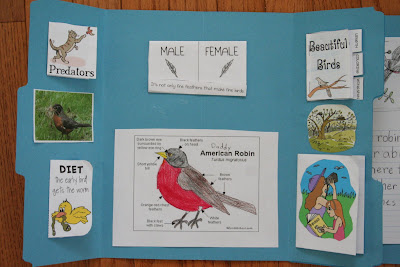
Zachary’s lapbook only used one file folder ~ I opened it flat and then re-folded it so that there were two smaller flaps on the sides. The above picture shows the front and the back of his lapbook {cover pic is linked below} For the back cover, Zachary drew a picture of some worms and dictated a few sentences to me:

“Robins can see the ground moving. That means worms are going underground. They eat them.”

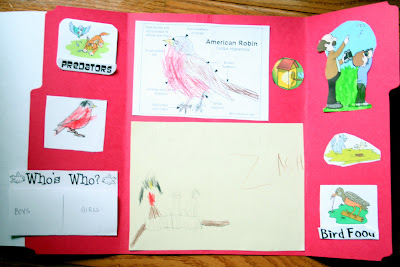
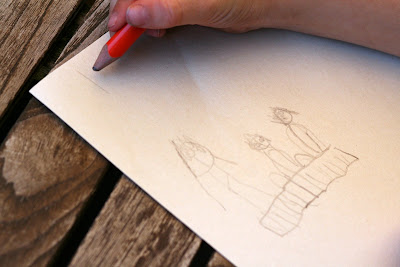
There are only a few minit books inside: Who’s Who {difference between male and female birds}, bird food, predators, a coloring sheet with a robin’s anatomy, clip art and a drawing Zachary made of a robin’s nest. I didn’t get a very good picture of his completed drawing, but it’s hysterical! The robins all have their heads straight up, mouths open and waiting for food. He was so proud because he did it all by himself and wrote “This iz a robin” along the top.

Here are a some shots inside the lapbook and with the minit books fully opened:

During the week we also worked on memorizing a little poem about “Little Robin Redbreast”. Zachary did great memorizing the first stanza of it:

Little Robin Redbreast

Little Robin Redbreast sat upon a tree,
Up went pussy cat and down went he;
Down came pussy, and away Robin ran;
Says little Robin Redbreast, “Catch me if you can.”

Little Robin Redbreast jumped upon a wall,
Pussy cat jumped after him and almost got a fall;
Little Robin chirped and sang, and what did pussy say?
Pussy cat said, “Meeow!” and Robin jumped away.


Links for the Lapbook
:

Be sure to check out my post about the girl’s robin lapbooks. I’m covering a lot more information about the things that we talked about during the week and will have more resources and links in that post!

About the Preschool Corner:

The Preschool Corner is a place for us to share the ideas we are using during our “preschool time” with our kids. You can join in the fun and record what you are doing in your house. Please link your exact blog post to the Mr. Linky below (if you have questions feel free to ask). Be sure to link back to this blog post so that your readers can find some other great ideas too!

The guidelines can be found here if you need them.

Share what you’ve been doing in your house this week!

Photobucket

Robin Lapbook and Unit Study

Little did I know that one simple robin’s nest would take us on an adventure into learning some fun things about robins ~ and more about the creativity of God!

We watched a mommy robin build her nest right outside our window, found out {thanks to Zachary putting his hand in the nest} that she had laid three eggs…and then watched and waited patiently.

Until she abandoned the nest three days before the eggs were supposed to hatch.

Regardless, we continued on with our robin study and learned so much. We’ve all been sharing the little tidbits that we’ve learned with others we know, because it’s too neat NOT to share!

At the end of the post I’ll include a full list of all the great links and resources we used over the last bit. I’ll also throw in some of the fun facts we learned as I post pictures of the lapbooks the girls put together. Tomorrow I’ll be posting the lapbook we did for Zachary as part of the Preschool Corner.

Every day we spent time memorizing “Little Robin Redbreast” and also sitting outside to observe the robins {and other birds} in our yard ~ their songs, habits, etc… We also worked on the minit books that went along with what we were studying that day.

Monday: A Robin’s Habitat ~ Our backyard

  • Identifying robins: difference between males and females ~ minit book
  • Scientific name of robins: turdus migratorius
  • Migration of robins & minit book
  • What do robins eat?
  • How do robins find their food? We had so much fun watching the robins in our yard and learning that they actually see the ground move ~ not hear like we originally thought!

Tuesday: Life Cycles/Nesting ~ Getting ready for babies

  • What are the predators of robins?
  • Who builds the nest?
  • Robins ‘chore chart‘ ~ who has what responsibilities in raising babies. You guessed it, it’s primarily the momma robin. We learned that the mom lays one egg a day and that it generally takes 2 weeks for the eggs to hatch. The mother robin spends on average about 50 minutes of each hour sitting on the eggs in the nest.

Wednesday: Keeping up with the babies

  • Feeding habits of babies ~ wow! We were amazed to learn that the parents have about 100 feedings a day. {And I thought that my kids ate a lot}
  • In the first two weeks of life, each baby eats the equivalent of 14 feet of worms ~ we even went into the backyard and measured that out.
  • Babies weigh less than a quarter when they are born and are almost the same size as their parent within 2 weeks.
  • Disposable diapers for birds ~ This was amazing!! Did you know that every time a baby robin eats it poops right away? That way the parents are there to pick up after them. Their poop is contained in a little sac that the parents can pick up {just like a disposable diaper} and carry away from the nest. This helps keep the nest clean.

Thursday: Listening to robin’s songs

  • What are the different songs of robins ~ we sat outside and listened to them
  • Put our lapbook and minit books together
  • Wrote/journaled and illustrated our robin stories. The girls used Draw Write Now to do the first page and then drew their own pictures on the second page. We use a lined journal that has room for drawing on the top of the page and then I photocopy their work to put in the lapbook.

Books we used

Free Bird Nature Study Printables!!

Bird-Nature-Study-Printables-from-Homeschool-Creations.jpg

If you are looking for some additional notebooking style pages, don’t miss the free Bird Nature Study Printables. It includes bird tracking, information pages, labeling activities and much more! 


Some Great Resources

Photobucket

What I Love About Homeschooling

You know what I love most about homeschooling? Well, it’s at least in my top five favorite reasons….

We can stop whatever we are doing and completely change course if we want to.

My schedule for the girls has been learning about the countries of the world. Zachary is going through the alphabet. But right now we’re putting a pause on all that, because of something amazing that is happening right outside our window.

Robins have been building a nest in a tree right in front of our house. The kids can literally sit in front of the window and watch everything. And today, we found three eggs in the nest too!

Can you guess what we’ll be learning about for the next little bit? I’m off to madly scramble and pull together our lessons!

Photobucket

Making Sea Fans and Coral Reefs

Otherwise known as the Great Ocean Biome Diorama.

Say that ten times fast and you’ll have a great sum-up of my week.

Laurianna has been studying about different biomes and she had to choose one biome and make a diorama of it ~ she chose saltwater.

Rather than having everything be flat and just a cut-out we decided to have a little fun and thought you might like to see how to make a few quick and simple 3-D underwater specimens of your own.

What You’ll need:

~ needlepoint canvas
~ orange paint & a brush {or color you choose to make your sea fan}
~ orange {or other color} pipe cleaner
~ scissors
~ newspaper.

Make the Sea Fan:

1. Cut the needlepoint canvas in the shape that you would like your sea fan to be (a tree shape). The shape doesn’t have to be exact – they’re all different. :)

2. Paint the canvas orange {use the newspaper to protect your surface} and let it dry.

3. When the canvas is dry, use the pipe cleaner to make ‘branches’ and a ‘trunk’ on the canvas.

What You’ll Need:

~ playdough or modeling clay
~ paint and a paint brush
~ radiatore pasta {small ruffled and ridged shaped pasta}
~ newspaper

Make the Coral Reef:

1. Form a ball with your playdough or modeling clay and flatten it just a little bit. Size will vary based on either your diorama size or what you are making it for. Our balls were about 2 inches in diameter.

2. Press the pasta into the clay to create a ‘brain-like’ pattern.

3. Paint your coral mass and let it dry!


{A few other notes}

~ The shark ‘swims’ across the sea. He is glued to a popsicle stick and travels along a slit at the top of the box.

~ We used blue tissue paper as our water and half a sheet of sandpaper as our ocean floor.

~ Laurianna drew fish, crabs, jellyfish and the shark to decorate her diorama. The fish are hanging by a clear sewing thread from the top of the box. We also used shells and coral that we found on the beach to decorate it a little more.

Photobucket

Apologia: Flying Creatures of the Fifth Day

Several months ago we took a trip to the Museum of Natural History with our girls. During our time there I grew more and more irritated looking at what my tax dollars were paying to teach other children. Watching people gape at a little bronze rat, ‘our earliest ancestor’, made me sick to my stomach and I returned home with a renewed passion to instill a deep understanding of Creation and a love for its Creator in our children.

I asked a friend of mine about different science curriculums and she recommended the Young Explorer Series from Apologia to me. Before I even had a chance to do much research on the company, I received their book Flying Creatures on the Fifth Day to review – a complete and total blessing! We started working through the book a few weeks later and can say that this is a curriculum series we will continue to use in the years to come.

Exploring Creation with Zoology 1: Flying Creatures of the Fifth Day is the first book in the Apologia’s Young Explorers series on zoology. It is a creation-based curriculum using a Charlotte Mason approach for learning. Students are encouraged to notebook along with their studies. The text is written directly to children, targeted toward children ages 6 to 13. In Flying Creatures

“…children will begin exploring the dynamics of flight and animal classification, understanding why the design we see in these incredible creatures points us to our Creator God.

Then, get ready for the exciting adventure of learning about birds. Your children will learn how to attract various bird species to your yard and identify them by looking at their special physical characteristics, diverse nests, and interesting domestic practices.

They will also learn the anatomy and the glorious design that enables birds to do remarkable things. After becoming amateur ornithologists, your children will explore the world of chiropterology, which is the study of bats.“

Flying Creatures provides 14 lessons packed full of information (you can view lesson one here). The lessons can seem overwhelming at first, but they recommend breaking each chapter/lesson up into segments. Once lesson one is completed you can continue with the remaining lessons in any order you choose. If the weather is warm in your area, you can study insects or whenever it is convenient for you.

Our girls were a little overwhelmed when they first saw the book, but we have been slowly working our way through the first chapter and they are picking up so much! We are notebooking and lapbooking along with our learning to record what we have been talking about. Their favorite part has been learning about how animals are classified and learning the meme to go along with the classification system: “Kings play chess on fine glass sets.” The first letter in each word matches the first letter in the words of the classification groups: Kingdom, Phylum, Class, Order, Family, Genus, and Species. And you know the girls think they are too smart now that they know all of those!

Some things I love about the book:

  • Projects and experiments ~ Each lesson includes different hands-on experiments and projects to do with your children. The experiments generally use common household items. The book provides a list of the items needed for all the experiments for quick reference also. Each lesson generally provides several things to try.
  • Notebooking – Each lesson provides notebooking activities so that your child can keep a record of what they are learning in the lessons.
  • A full year on a focused subject – Rather than just touching on the subject of ‘God made birds’ the curriculum spends the entire year on one subject, allowing children to do more than just scratch the surface of the subject

If you would like more information on Flying Creatures of the Fifth Day, there are several pdfs available for viewing online: the table of contents, an introduction to the book, a course overview, notebooking examples, lesson examples, zoology flashcards, and lab information.

Apologia also has other books available in the Young Explorers series focused on astronomy, botany, swimming creatures and land animals. There is also a great Yahoo group for Apologia that focuses on the elementary science books by Jeannie Fulbright where I have found some great resources ans answers to questions. If you have older children, be sure to check out the other science options that Apologia offers too.

Click on the Homeschool Crew banner to read other reviews
about this book and others available from Apologia.

Photobucket

Volcano Lapbook and Unit Study

Volcanoes were top on the list of things to study when the girls found out that Mt. Fuji was actually a volcano. We decided to work together on a lapbook from Homeschool Share. Lapbook components that we studied and used were: parts of a volcano, volcanologist, who’s going to blow, trivia game, inside a volcano, exploding volcano (scholastic pull-tab), volcano phases, vocabulary words, ring of fire, types of rocks, and the earth’s plates.

Our “art” project was to build our own volcano. The kids were far too excited to see how it would explode in our backyard.


On Monday we made some salt dough and formed a volcano using a tea bottle and a cardboard box. I based the model we made from this one that I found through a google search.

The dough took a few days to dry, so on Wednesday we were able to paint it together. I outlined a few areas for the girls and they worked together to paint it to make it look more like a scene/cutaway of a volcano. When they were done with the base painting, they let Mommy drip red paint around the ledge of the volcano to make it look like lava was dripping down the sides of the mountain.

Here is our completed project in action. Be warned: Screaming toddler and swinging lens cap may disrupt your viewing pleasure.

Volcano links for kids: