

Quite a few of you have emailed me or commented asking different questions and since they are piling up in my ‘blog questions’ folder, it’s time to answer a few of the questions!
Q: If you don’t mind my asking, I was wondering where you get your photographic clipart for your printables (the consonant cards, color cards, etc.) I have a subscription to clipart.com, but was wondering if there was another source for good clipart?
A: Microsoft, baby.
For most of the documents that I create, I use Microsoft Publisher and then convert it into a pdf file {don’t worry, I’ll explain that in a bit}. I am ever-so-cautious about the graphics I use because of copyright issues. The clip art that is included in the printables will come from copyright free sources {or ones that give permission to use them}.
I do numerous searches in Microsoft {both the program and online} to find the right ‘photo’ or piece of clip art. Sometimes I will edit the graphic {crop, etc…} to make it work, but otherwise, it all comes from Microsoft. The only exception I can think of right off hand were the preschool number cards that used graphics from the public domain site Disney Clip Art.
Personally, I am a little skeptical about doing Google searches, because I just don’t know where the graphics originated. While I might make something for my own personal use, I am careful with what I share so that I don’t infringe on other’s copyrights.
To convert my documents into pdf’s I use a program called CutePDF Writer – it’s free and ever-so-handy!
Q: How do you make the tilted thumbnails of your scribd documents?
A: I use two different things to create my thumbnails ~ screenshots and Picasa. I usually pick a page or two from the document that ‘jump’ out at me the most and use the ‘print screen’ feature on my keyboard to capture a jpeg image of each document page. If your computer has that feature it’s usually located up in the top right of your keyboard. :)
Once I have the jpeg image saved, I use the program Picasa {a free download from Google} to do quick edits and create those thumbnail images that have text on them. Picasa makes it super-easy to add a border around a picture, add text to an image, create collages and even touch up colors and lighting on pictures.
Another great feature of Picasa is that you can rotate, tilt and mix images together when you create your collages. So when you see two of the pages in my thumbnail, I’ve just created a different collage. I LOVE it!!
When I’m done editing and cropping the picture I upload it, copy/paste the code and then link it to Picasa {and I’m aware that some of you are just hearing ‘blah, blah, blah, blah…’ ~ but I promise it’s a great program!!}.
Q: I just signed up with Scribd (cause I saw that was how you do it) and it uploaded fine. I just can’t figure out how to get that uploaded to my blog.
A: Hopefully this screenshot will help you out some. Toward the top of the page {the top red arrow on this graphic points to it} you will see a tab that says ‘Share & Embed’. Click on that tab.
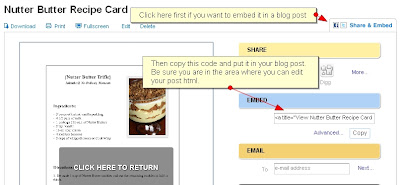
Underneath the blue bar where it says ‘Embed’ you will copy that code and enter it into your blog post while you are in the ‘edit html’ part of writing your blog post.
Hope that helps some of you all out some! Let me know if you have any other questions!


 The printables shared on this site are FREE of charge unless otherwise noted, and you are welcome to download them for your personal and/or classroom use only. However, free or purchased printables are NOT to be reproduced, hosted, sold, shared, or stored on any other website or electronic retrieval system (such as Scribd or Google docs). My printables are copyright protected and I appreciate your help in keeping them that way.
If you download and use some of my printables and then blog about them, please provide a link back to my blog and let me know - I'd love to see how you are using them! Please be sure to link to the blog post or web page and not directly to the file itself. Thank you!
The printables shared on this site are FREE of charge unless otherwise noted, and you are welcome to download them for your personal and/or classroom use only. However, free or purchased printables are NOT to be reproduced, hosted, sold, shared, or stored on any other website or electronic retrieval system (such as Scribd or Google docs). My printables are copyright protected and I appreciate your help in keeping them that way.
If you download and use some of my printables and then blog about them, please provide a link back to my blog and let me know - I'd love to see how you are using them! Please be sure to link to the blog post or web page and not directly to the file itself. Thank you!
Leave a Comment
You must be logged in to post a comment.