


These little pumpkins were so super-easy to make and all of our kids wanted to make one, so we had them hanging all over our house for the last few weeks! Here’s what you’ll need:
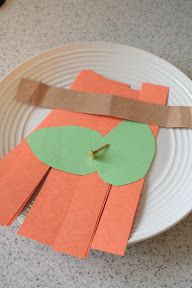
- Orange construction paper cut into 1″ strips
- 1″ strip of brown construction paper
- 2 leaves cut out of green construction paper
- 2 brads
- hole punch
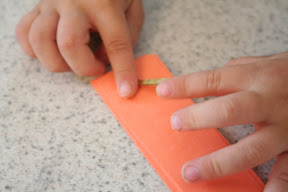
1. Stack the orange strips of paper together. Use the hole punch to put holes in the end of the strips. Depending on how many strips you are trying to punch through, you many need to do it a few pieces at a time.
2. Take one brad, poke it through the hole, and fasten the strips together.
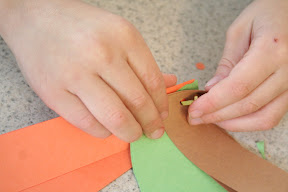
3. Fold the brown strip in half {for the stem} and use the hole punch to punch through the stem, leaves, and the strips on the opposite end. Push another brad through and fasten.
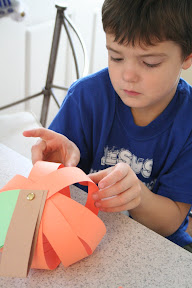
4. Spread or ‘fluff’ out the paper strips until it forms a round pumpkin shape. Hang and enjoy!


 The printables shared on this site are FREE of charge unless otherwise noted, and you are welcome to download them for your personal and/or classroom use only. However, free or purchased printables are NOT to be reproduced, hosted, sold, shared, or stored on any other website or electronic retrieval system (such as Scribd or Google docs). My printables are copyright protected and I appreciate your help in keeping them that way.
If you download and use some of my printables and then blog about them, please provide a link back to my blog and let me know - I'd love to see how you are using them! Please be sure to link to the blog post or web page and not directly to the file itself. Thank you!
The printables shared on this site are FREE of charge unless otherwise noted, and you are welcome to download them for your personal and/or classroom use only. However, free or purchased printables are NOT to be reproduced, hosted, sold, shared, or stored on any other website or electronic retrieval system (such as Scribd or Google docs). My printables are copyright protected and I appreciate your help in keeping them that way.
If you download and use some of my printables and then blog about them, please provide a link back to my blog and let me know - I'd love to see how you are using them! Please be sure to link to the blog post or web page and not directly to the file itself. Thank you!
I saw this pumpkin on another site using hot glue! So glad to find it using the brad! I passed it on to my daughter’s first grade teacher! I know we are going to try these at home! Thank you!
you can do the same with an apple too ~ super cute!
Okay, I do not understand how you only use one brad.
Darling! Thanks for sharing!
Think u could use with staples instead of Brads???
you would have to make sure it was all spread out correctly before stapling. You can’t stack and staple. The brads make the paper moveable and the staples would be hard to move the paper. :)
Just did it this morning with my kids. We love it. Thank you!