20 Best Tips

Organizing School Paperwork

Organizing-School-Paperwork-a-simple-folder-system-that-works.png

I know it’s practically the end of the year, so how about we consider this a suggestion for organizing schoolwork for next year, ok?

In reality, I lost the SD card that had these pictures on it and completely forgot that I was going to share the idea with you all until I found it the other day {ahem}.

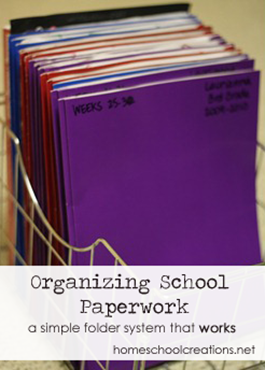
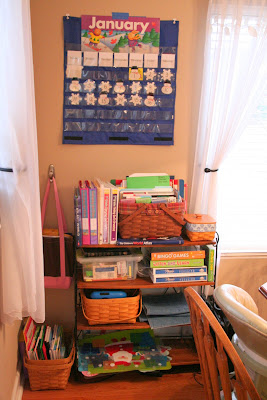
I’ve used this system for the last few years and it has worked great for us so far. If you remember, our kids are color-coded {they each have their own ‘color’ that identifies things that belong to them}. All of our folders are stored in a wire bin and sorted so that I can quickly grab an upcoming {or completed} folder if I need to find something.

It’s a little extra work at the start of school for me, but I take a few hours, pull out all of the workbooks that we will be using for the year, rip out all of the pages and sort them for each kiddo. Truthfully, it saves me a lot of time in the long run since everything we need is divided up and ready to go for each week.

The Method to My Madness

I use six paper pocket folders per child and label the fronts of each folder ~ ones that are pretty cheap. I break the school year up into six 6-week segments {a total of 36 weeks}. The front of each folder is labeled with a name, grade, school year and the 6 week segment that it covers. For example, the front of one of the folders might read:

Weeks 31-36                         

Laurianna                           

3rd Grade {current grade}

2009-2010 {current school year}IMG_3096

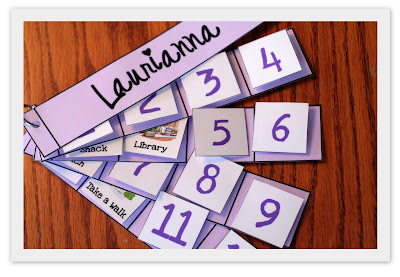
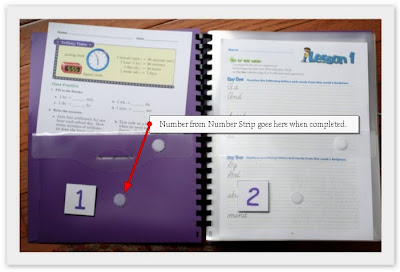
I separate out the worksheets into six piles for the 6-week segments and then further divide them out into weekly piles. Since our writing curriculum {A Reason for Handwriting} is divided out into weekly lessons, it helps me keep track of the week that I’m sorting. Each week’s worth of lessons/worksheets is then paperclipped together {see below}.

IMG_3099

Each week includes our handwriting, math worksheets, writing pages, etc…basically anything that was ‘pre-packaged’ and able to be ripped out of a workbook. As we move through our school year, I keep everything that goes along with that six week segment in that specific folder.

IMG_3101

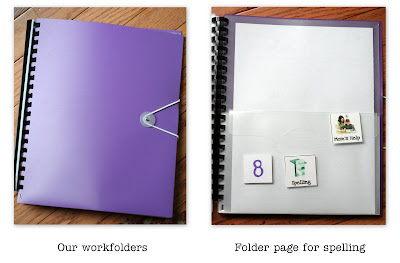
At the start of each 6 week segment, I put all of the papers on the left hand side of the folder. Each week’s worth of paperwork remains clipped together until we work on that week. If we add any paperwork during the week {spelling lesson, test, notebooking sheets, etc…} it is sorted into the pile for the week it was completed.

Completed papers are then moved to the right hand side of the folder. At the end of the week the schoolwork papers for that week are all paperclipped back together and moved to the back of the folder. When we’ve worked through a six week segment and the folder is full, the folders are put at the back of the wire bin and I pull out the next six week folder for each of the kids.

At the end of the year, all of our folders are put into a large rubbermaid tub that I keep with all of our school records.  If I need to sort through and find schoolwork for a particular child/particular year, it’s so much easier since I already have things color-coded and sorted out for me.

Make sense? Just wanted to share a little something that is working for us in organizing our school work. Let me know if you have any questions!


Answers to some of your questions

Cindy asked: What do with worksheets that are front and back that you need for another week?

Answer: I usually put it in the week that we complete it. :) I generally write down the page numbers of worksheets that we complete in my planner also, and my planner gets stored with all of our folders at the end of the year.

Allyson asked: I think we’ll probably want to reuse workbooks for a couple of children in order to save money. What would you suggest for that? Do you reuse any of your workbooks or do you purchase new ones even if you have a child that will use it the very next year?

Answer: We do reuse some of our workbooks, but there are some that I realized were just cheaper in the long run to buy and actually use ~ handwriting, etc… Several of the workbooks that I use {Complete Writer} are actually able to be photocopied too, so that’s what I do in that case. If it’s a worksheet that we slip into a page protector {Critical Thinking}, I just record the page number they completed in my planning book.

Homeschool Calendar and Morning Board

Updated ~ See the most recent version of our homeschool calendar and morning board  ~ lots of links and new printables!! 

I gave you all a little peek at our calendar and morning routine time, but still have a little more to share!!  Our calendar time has changed over the year, especially after Carisa and I got together last fall and I saw her calendar and morning board in person.

For some reason, it never crossed my mind to put all of our learning things onto a piece of foam board. {duh} I picked some foam board at Target the next week and started piecing our ‘morning board’ together. I recently re-organized it after putting together a few extra pieces for the board, and will try to explain everything as it is numbered below.

We start out our morning using a pocket chart calendar. Zachary and Kaleb work together with me on this calendar where we talk about the days of the week, months of the year, and patterns. The boys help me pick a pattern for the month and each morning have to tell me what the next sequence in the pattern is.

The month titles are great for working with Kaleb on identifying letters and each day we count up to the number/day of the month {i.e. on the 17th of the month we would count up to 17}. We also sing our days of the week song and the months of the year. You can find me actually singing those learning songs here ‘live and in person’ ~ you know, should you need a good giggle for your day. If we’re lower on the numbers {i.e. less then 10} we practice counting in Spanish.

After we’ve finished our calendar routine, we move onto our board.

Homeschool Morning Board

1. Today is… This is a printable that I downloaded from Carisa at 1+1+1=1. One of our girls will fill out the day and date information after Zachary and Kaleb have finished our daily calendar. Part of this is hanging using jump rings and underneath there is another part of the same printable {Carisa shows more on her site}.

Days in School printable

2. Days in School ~ This is a sheet that the girls use to fill in how many days we’ve been in school. Underneath the number that they fill in, we break the number down by ones, tens and hundreds. We then use number words to create the number, again by ones, tens, and hundreds. The numbers and words are all color coded {i.e. any number to go in the ones spot is green, tens are red and hundreds are blue}. Pieces all attach with velcro dots.  Added 7/25/2010 ~ If you use Math U See, you can use the Math U See version of the Days in School printable that has red for the 100’s, blue for the 10’s and green for the one’s places.

3. Make the Date ~ This is another great printable from Carisa that you can find on her Calendar page. We use coins to count up to the date number {i.e. the 7th would be a nickel and two pennies}. We use some play money with velcro dots attached to the back, so that the kids learn to identify the coins.

Homeschool Morning Board

4. Obedience prayer/reminder. This area of the board is actually layered {see the picture above}. There are some small adhesive hooks on the board and I hung pages inside page protectors from them. Right now the top layer is a page that I printed off from a fantastic From Tots to Teens post at about Love. Underneath that layer are…

skip counting charts

5. Skip Counting Charts ~ I have a plastic page protector taped to the board and can slide our skip counting charts into this slot {or another 8 1/2” x 11” sheet}.

Today's Temperature Graphy

6. Today’s Temperature ~  This printable has two thermometers on it where we mark the indoor and the outdoor temperature. I printed it off on cardstock and laminated it, so we use a dry erase marker to draw the ‘mercury’ in each thermometer. :)

7. Bible Verses ~ There are two pockets (I cut up a 4×6 photo book page for the ‘pockets’) that we slide our weekly Bible verses into ~ one for the girls and one for Zachary. When the kids are done learning their verse, we move the card to their small verse book with the collection of verses that they have learned throughout the year.

8. What’s the Weather Song ~ This song printout is from Carisa’s calendar page on her website. I just printed it off, mounted it on a piece of construction paper and laminated it.

Weekly weather graph

9. Weekly Weather Graph ~ Our weekly weather graph that Kaleb and Zachary both do. The pieces all have velcro dots on them and after they look out the window to see the weather, they pick the correct weather card to put in that day of the week slot.

Here’s a look at the wall where our morning board is hanging {on 3M removable wall hooks ~ love those things!}.

Homeschool Morning Board

Above our calendar we have other printables  that we are using ~ currently they are a poem we are working on, a sheet called ‘God’s Standards’ from Jill’s Tots to Teen post,  and also some music theory information {and before you ask, the pocket page holders are from Ikea}.

Storage for Extra Stuff ~ All those extra weather tags, numbers, words and coins needed to be stored in a central place. I have them inside some plastic envelopes that are about 6” x 6” in size {they are actually envelopes from some of my Close to My Heart scrapbooking supplies}. I also had a box from the company that was intended to store the supplies in and it is now designated to hold our calendar stuff. There are some dry erase markers and paper towels also in the box {to wipe off and write on}. The box just slides onto one of our nearby shelves. :)

Calendar Storage

That’s pretty much it! The links to all the printables are above in the descriptions. If you are interested in using some of the things that we did to put our together, you can start off with an inexpensive foam board from Target or Walmart {under $3}, some double-sided tape and some of the supplies I have listed below. I LOVE velcro dots….and my laminator. It’s a sickness….

If you have any questions, leave a comment and I’ll try to help you out!


How We’re Using Workboxes

Note: For those of you who have asked about how this worked for us during the year ~ it went well, but we did do some tweaking! See the post Our New Workbox System: Weekly Workbox Grid to read more about our updated system!

While I love the Workbox System and understand why Sue Patrick set it up the way she did {and why it works that way}, we seriously do not have room for 48 boxes, 4 shelving systems and to implement it the way she recommends. Kaleb’s workboxes are very similar to Sue’s system, but for our other three we modified the system to fit our family and it is working great for us.

Want to see some pictures?

Our workbox number strips and tags hang over near our school shelves in our dining room. Each of our kids is color-coded {trust me, it helps keep track of all those different school supplies}.

The strips are laminated and I punched them with a hole punch and hooked them onto a book ring. We hang them on one of the 3M adhesive hooks and the kids can take them down to put in their ‘work space’ when it’s time for school.

Next to where our tags hang we have a set of four drawers. The drawers all hold the kids school supplies: markers, pencil boxes, our ‘workfolders‘, mini office folders, journals, and books that are specific just to them.

Our workboxes are actually more like ‘workfolders‘. I saw a similar idea on one of the yahoo groups and walked into Walmart a few days later and found folders that were all our kids color codes. Each of the folders originally only had 8 pockets, so I bought a few extra folders, took the comb binding off, and added a few extra pages so they all had 12 pockets. The inside folders are clear. If something that we are doing doesn’t fit into one of the folders {a puzzle, a manipulative, or a ‘hands-on lesson’} the kids have a special tag on their folder that lets them know what they should be doing.

Most of the folder pages have their worksheets, journals or papers they need slid into the folder itself. When they finish the page, they remove the number from their number strip and put it next to the number on their folder. If there is another tag on that page already {see the picture tagged ‘folder page for spelling’ above} we have a basket in the middle of our table where the kids return the ‘extra’ activity cards for me to sort and store later.

Those big and bulky items need a place to be stored for the kids to find. Kaleb’s shelf has 12 boxes, and 4 of the boxes are oversized. Kaleb’s school things are in the top 8 boxes and if there is a puzzle or special game the older kids are going to work on, they find them in the bottom 4 boxes.

I have quite a few activity and subject cards for things that we do during our school day that don’t have worksheets to go along with them {spelling, geography, language} ~ all things that the kids work 1:1 with Mommy. Kari from The Snails Trail mentioned that she had found a pocket chart in the dollar section at Target, so I ran over there quickly to grab one for myself. I have the chart stuck on the inside of my spice cabinet {yeah, my husband was thrilled to see that}. I used the removable adhesive hooks and tabs from 3M to keep it hanging up on the cabinet door.

There are cards we use daily {located on the bottom rows}, subjects and activities we only do one or two days a week (alphabetized in the top few rows}, and special cards for activities out of the house {museum, library, and outside activities}. I have them sorted so I can grab them quickly.

That is our system in a very LARGE nutshell. :) If you have any questions, feel free to ask.

You can view and download all my workbox printables that go along with our workboxes, in my post titled Workbox Tags & Cards. Also, don’t forget the fun preschool workbox number cards for your little ones!.

Photobucket

Our Storage Setup

Our desk space and school space is also known as our dining room. When we first started homeschooling I really tried to keep the two separate so that our dining room was a dining room. And it didn’t look like a preschool had come in our house and thrown up all over the place.

Then I had a revelation. Ummm…we’re homeschooling and it’s ok.

I’m quick like that.

Once I gave myself permission to merge school and house (because it was completely self-imposed) things began moving around our house and coming out of hiding. Shelves came up from the basement and found their way into our room one weekend while my husband was away. Because I was truthfully getting a little tired of running downstairs to grab this or that when we needed it.

The majority of the toys/tubs on the shelves are all of Kaleb’s ‘special toys’ for Tot School time with Mommy. The top shelf hold a lot of our science books in a tub {for Zachary}and the books that we aren’t currently using to go along with our geography studies {the blue crate}.

This is where have school. And truthfully, now that the two have fully merged ~ I love it. I even have some other plans in the works for next year to make it even more fun for ‘school time’. We have our world map, chalkboard (peel and stick tiles), colors and shapes for Kaleb, a white board, calendar and some more storage.

I’ve mentioned the chalkboard squares to you all before (just can’t tell you how much I love them!!)

I used this calendar when I used to teach {and you all can obviously tell how long this post has been sitting in my ‘drafts’ folder waiting to get together…ummm…January???}. The calendar has been such a huge help with Zachary this year and even Kaleb. Zachary picked up on the days of the week, months of the year and counting very quickly, especially since we use it every day. Each month we use a different pattern to help with pattern recognition. In January our pattern went snowman, snowflake, snowflake…the pattern varies based on the month/theme. February is hearts (red/pink), March is flowers (purple/yellow), etc…and Zachary helps pick the pattern at the beginning of the month.

The books we use everyday for homeschooling are stored here. The basket on the floor holds the everyday books and worksheets. The shelves hold a bin with school supplies and math and learning games. The bigger boks that won’t fit in our baskets stand on the shelf (our Galloping the Globe notebooks, etc…). The additional basket holds Zachary’s papers and workbooks along with the kid’s pencil boxes, etc…

Of course once school winds down for this year, I’m going to be re-organizing everything.

Again.

Because sitting still isn’t something that I do well…and I have some ideas floating around in my head.

For next year I’m also looking at Sue Patrick’s Workbox system, so I’m sure there will be some changes when that is implemented too. Just wanted to share what we’re doing now. :)

Photobucket