20 Best Tips

Homeschool Calendar and Morning Board

Updated ~ See the most recent version of our homeschool calendar and morning board  ~ lots of links and new printables!! 

I gave you all a little peek at our calendar and morning routine time, but still have a little more to share!!  Our calendar time has changed over the year, especially after Carisa and I got together last fall and I saw her calendar and morning board in person.

For some reason, it never crossed my mind to put all of our learning things onto a piece of foam board. {duh} I picked some foam board at Target the next week and started piecing our ‘morning board’ together. I recently re-organized it after putting together a few extra pieces for the board, and will try to explain everything as it is numbered below.

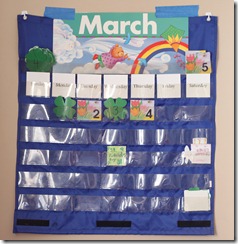
We start out our morning using a pocket chart calendar. Zachary and Kaleb work together with me on this calendar where we talk about the days of the week, months of the year, and patterns. The boys help me pick a pattern for the month and each morning have to tell me what the next sequence in the pattern is.

The month titles are great for working with Kaleb on identifying letters and each day we count up to the number/day of the month {i.e. on the 17th of the month we would count up to 17}. We also sing our days of the week song and the months of the year. You can find me actually singing those learning songs here ‘live and in person’ ~ you know, should you need a good giggle for your day. If we’re lower on the numbers {i.e. less then 10} we practice counting in Spanish.

After we’ve finished our calendar routine, we move onto our board.

Homeschool Morning Board

1. Today is… This is a printable that I downloaded from Carisa at 1+1+1=1. One of our girls will fill out the day and date information after Zachary and Kaleb have finished our daily calendar. Part of this is hanging using jump rings and underneath there is another part of the same printable {Carisa shows more on her site}.

Days in School printable

2. Days in School ~ This is a sheet that the girls use to fill in how many days we’ve been in school. Underneath the number that they fill in, we break the number down by ones, tens and hundreds. We then use number words to create the number, again by ones, tens, and hundreds. The numbers and words are all color coded {i.e. any number to go in the ones spot is green, tens are red and hundreds are blue}. Pieces all attach with velcro dots.  Added 7/25/2010 ~ If you use Math U See, you can use the Math U See version of the Days in School printable that has red for the 100’s, blue for the 10’s and green for the one’s places.

3. Make the Date ~ This is another great printable from Carisa that you can find on her Calendar page. We use coins to count up to the date number {i.e. the 7th would be a nickel and two pennies}. We use some play money with velcro dots attached to the back, so that the kids learn to identify the coins.

Homeschool Morning Board

4. Obedience prayer/reminder. This area of the board is actually layered {see the picture above}. There are some small adhesive hooks on the board and I hung pages inside page protectors from them. Right now the top layer is a page that I printed off from a fantastic From Tots to Teens post at about Love. Underneath that layer are…

skip counting charts

5. Skip Counting Charts ~ I have a plastic page protector taped to the board and can slide our skip counting charts into this slot {or another 8 1/2” x 11” sheet}.

Today's Temperature Graphy

6. Today’s Temperature ~  This printable has two thermometers on it where we mark the indoor and the outdoor temperature. I printed it off on cardstock and laminated it, so we use a dry erase marker to draw the ‘mercury’ in each thermometer. :)

7. Bible Verses ~ There are two pockets (I cut up a 4×6 photo book page for the ‘pockets’) that we slide our weekly Bible verses into ~ one for the girls and one for Zachary. When the kids are done learning their verse, we move the card to their small verse book with the collection of verses that they have learned throughout the year.

8. What’s the Weather Song ~ This song printout is from Carisa’s calendar page on her website. I just printed it off, mounted it on a piece of construction paper and laminated it.

Weekly weather graph

9. Weekly Weather Graph ~ Our weekly weather graph that Kaleb and Zachary both do. The pieces all have velcro dots on them and after they look out the window to see the weather, they pick the correct weather card to put in that day of the week slot.

Here’s a look at the wall where our morning board is hanging {on 3M removable wall hooks ~ love those things!}.

Homeschool Morning Board

Above our calendar we have other printables  that we are using ~ currently they are a poem we are working on, a sheet called ‘God’s Standards’ from Jill’s Tots to Teen post,  and also some music theory information {and before you ask, the pocket page holders are from Ikea}.

Storage for Extra Stuff ~ All those extra weather tags, numbers, words and coins needed to be stored in a central place. I have them inside some plastic envelopes that are about 6” x 6” in size {they are actually envelopes from some of my Close to My Heart scrapbooking supplies}. I also had a box from the company that was intended to store the supplies in and it is now designated to hold our calendar stuff. There are some dry erase markers and paper towels also in the box {to wipe off and write on}. The box just slides onto one of our nearby shelves. :)

Calendar Storage

That’s pretty much it! The links to all the printables are above in the descriptions. If you are interested in using some of the things that we did to put our together, you can start off with an inexpensive foam board from Target or Walmart {under $3}, some double-sided tape and some of the supplies I have listed below. I LOVE velcro dots….and my laminator. It’s a sickness….

If you have any questions, leave a comment and I’ll try to help you out!


Ultimate Guide to Homeschooling {Apologia Press}

Photobucket
If there was ever a book that I wish I would have had handy when I first started homeschooling, The Ultimate Guide to Homeschooling  from Apologia Press would be one I would have referred to often…and fortunately still can.  Each member of the Homeschool Crew recently received this revised and updated edition by Debra Bell to review and it’s one that will stay on my shelf for me to use and lend out to friends.

About The Ultimate Guide to Homeschooling

Debra Bell, the author,  is no stranger to the homeschool community. She homeschooled her four children from kindergarten through high school and now speaks at homeschool conventions, sharing what she has learned over the years and helping other parents navigate the homeschooling maze.

This newly revised and updated version of The Ultimate Guide to Homeschooling is larger than previous releases {500 pages} and included current information for websites and using technology at home. It also includes ideas for working with kids at different grade levels, how to keep toddlers busy, and teaching middle/high school classes.

What areas does the book cover? Apologia Press offers the ability to view the full table of contents and a sample chapter online {Six Ingredients of a Successful Home School}. The Ultimate Guide to Homeschooling is divided into ten different sections:

  • Homeschooling: Is It for You ~ looks at the challenges and advantages of homeschooling and also includes information for single parent families along with tips for success.
  • Choosing a Curriculum ~ learning styles, curriculum fairs
  • Organization and Planning ~ learning environments and daily schedules
  • Preventing Burnout ~ provides ‘Burnout Busters’
  • What to Teach ~ When and How
  • Homeschooling Teens ~ course study, college admissions
  • Computers in the Homeschool ~ Hardware and software
  • Creative Solutions ~ toddlers, reluctant learners and the transition from school to home
  • Measuring Your Success ~ assessment methods and targets
  • Resource Guide ~ products/supplies, academic contests and competitions

My Thoughts

I’m currently a little partial on the section related to burnout {grins} and also the 50 pages of resources that the book provides. It is chocked full of great information. Overall, this book from Apologia Press is a great tool to recommend to families that are considering homeschooling, new to homeschooling, or even looking at the ‘next step’ for their younger children. 

You can purchase  The Ultimate Guide to Homeschooling directly from Apologia Press {$20.00} and also find it through major online retailers such as Amazon. If you are interested in learning more about science products from Apologia, be sure to read my review on their Young Explorer Science Series.

Click on the Homeschool Crew banner to read other reviews about this product.
 

This product was given to me for review purposes, and I do not have to return the product to the vendor. I was not paid for this post. All opinions expressed in this post are mine.

Photobucket

Instant Challenge ~ Cup Holder

Photobucket

We joined along again this week for the second Instant Challenge hosted by Michelle @ Delightful Learning. Our challenge this week? Create a structure that would hold 2 cups.

The materials:

  • 6 straws
  • 1 piece of paper
  • piece of tinfoil
  • 3 mailing labels
  • 2 paperclips
  • 2 pieces of string
  • 1 envelope
  • 2 chenille sticks

Since the girls had a successful attempt last week, and are starting to get into the routine of the challenges, this one was a LOT easier to explain and get going. During the building time, both girls worked independently on different parts of the challenge.

McKenna worked on building the ‘deck’ for the bridge of the structure. She used the tinfoil, paper, envelope and the paper clips to put her piece together.

DSC07598

Laurianna worked on building the frame of the structure. She attached one end of each of the straws to a penny so that it would stabilize the straws. She then poked pipe cleaners into the straws to connect them together. Once she had the two main ‘arches’ built, she used the extra 2 straws to support the top of the bridge, tying them on with the string.

DSC07599

When McKenna had finished her top piece they carefully laid it on top of the main support. So far, so good!

DSC07600

Their next test {before the 7 minute building part was complete} was to see if it would support any weight, so they used the leftover penny to check.

DSC07601

Here’s a little look at the structure from underneath. Not the most beautiful, but when you’re using straws and tinfoil…what do you expect? :)

DSC07602

The big test was seeing if it would support the two cups and getting them as far apart as possible. SUCCESS!!!

Cup Holder test

Our Score:

  • 10/10 points for having a completed boat at the end of Part One.
  • 20/20 points for creativity in using the materials ~ they found a use for everything!
  • 13 points for how far each cup was from the table {1 point for each inch and they were each 6.5 inches off the table}
  • 18 points for how far apart the cups were {2 points for each inch and they were 9 inches apart}
  • 20/20 points for teamwork. I was impressed that they each worked on their own tasks to complete the project together!

Overall Score: 81/100

We’re gearing up for the next challenge: High Flying! “Up for a Challenge?” is a weekly meme designed to get students involved in critical thinking and creative problem solving by doing an Instant Challenge. If you are interested in being a part of the Instant Challenges, you can find out more here.

Photobucket

Instant Challenge ~ Boat Race

Photobucket

We joined along again this week for the second Instant Challenge hosted by Michelle @ Delightful Learning. Our challenge this week? Make a boat, have it FLOAT, and race it!

The materials:

  • 3 straws
  • 10 craft sticks
  • 3 Styrofoam cups
  • 3 marshmallows
  • 1 piece of string
  • 1 piece of foil
  • 3 mailing labels
  • 2 chenille sticks
  • 1 piece of paper

I am ever so pleased to announce that this challenge went much more smoothly than the first one ~ as in there was much sibling cooperation and happiness. {yeah!}

We set up two separate tables this time ~ one for building the actual boat and then one for the ‘test zone’ where we put the boat in the water. The girls had two minutes to talk through their building plan with each other.

DSC07551

Once they had a set plan in place {it took less than the 2 minutes}, they started working together to build their boat. Laurianna worked on the base of the boat, folding the paper into a basket shape while McKenna ripped the mailing labels in strips so they had more pieces to secure the corners.

DSC07557

When the base of the boat was done, they wrapped it in tinfoil so that the water wouldn’t seep onto the paper and make it wet.

DSC07561

To help give the boat a little added float power, they poked the three marshmallows through the center with the straws and formed a triangle shape for the boat to ‘sit’ on top of. To help the boat stay on top of the marshmallow raft, they tied it around the boat using the piece of string.

DSC07571

The craft sticks were used to reinforce the bottom of the boat and they used one of the cups as a ‘boathouse’ of sorts, sticking one of the chenille stems as a mast and using the paper the mailing labels came on as a sail.

Instant Challenge Boat Race

Test #1: Sea-worthy and floatable? CHECK!!

DSC07570

Test #2: Will it race? YES!! They stayed well behind the line and it went across the water easily {and well!}.

DSC07567

Our Score:

  • 10/10 points for having a completed boat at the end of Part One.
  • 25/30 points for speed on the water ~ it could have been a little faster!
  • 10/20 points for creativity in how the boat went across ~ the blowing wasn’t super creative, but it did get the job done!
  • 20/20 points for creativity in using materials. They used almost everything ~ two cups were left over, but they made good use of even the backing for the mailing labels.
  • 20/20 points for teamwork. This week was such a polar opposite from the last challenge. They did GREAT together!

Overall Score: 85/100

This challenge was a little easier for the girls overall, I think mainly because they understood it a lot better than last time too {easier to picture in their minds what was being asked}. They were excited that it even held several Little People and still floated around in the water…and so was Kaleb!

DSC07573

We’re gearing up for the next challenge: Cup Holder! “Up for a Challenge?” is a weekly meme designed to get students involved in critical thinking and creative problem solving by doing an Instant Challenge. If you are interested in being a part of the Instant Challenges, you can find out more here.

Photobucket

Instant Challenge: Build a Bridge

Photobucket

We joined along this week in the Instant Challenge hosted by Michelle @ Delightful Learning. "Up for a Challenge?" is a weekly meme designed to get students involved in critical thinking and creative problem solving by doing an Instant Challenge. Our kids were so excited when I showed them the projects we were going to work on together. The plan was for Rick to work on them with us….but Mommy got a little carried away and did the first one solo with the kids.

Even though the second challenge has already been posted, we started with the first one: Bridge Builders. The project was set up on the dining room table and overall was a pretty big success ~ the biggest challenge was keeping everyone focused on the task at hand and soothing the rioting crowds {and trying to let the kids solve the problem without adding in my 2 cents…}.

DSC07521

Laurianna actually did the majority of the bridge building on her own, since McKenna didn’t want to work as a team {which frustrated Laurianna to no end}. McKenna got a birthday phone call in the middle of the challenge, so Laurianna did the bulk of the building on her own.

DSC07528 The cards that made up the two pillars of the bridge were cut with scissors and wedged to fit together. Here’s the finished product:

DSC07523 The big question was: Would it support the weight of the nails??

DSC07527 We started counting up {getting nervous the more nails we added} ~ and guess what? We made it up to all TEN NAILS!!! YEAH!!!

Our Score {according to Mommy}:

  • 10/10 points for having a completed bridge at the end of Part One.
  • 50/50 points for being able to support the weight of all 10 nails {5 points per nail}
  • 10/20 points for creativity ~ it wasn’t super creative, but it did get the job done!
  • 5/20 points for teamwork {when McKenna was helping out} but I gave Laurianna a 20/20 because really she did it on her own

Overall score: 90/100 for Laurianna doing the project independently. 75/100 if we count it as a joint effort.

This was a great first project for us and we have the supplies on hand to work on the next challenge: Boat Race! If you are interested in being a part of the Instant Challenges, you can find out more here.

Photobucket

Workbox Tags & Cards

Updated: We’ve altered how we use the cards and the workbox system since starting. We now are using a weekly grid along with the cards. See how we’re using the workbox system along with pictures here: https://www.homeschoolcreations.net/?p=1378


Now that you’ve heard about the Workbox System and read how we use workboxes in our house, it’s time to share some printables with you. I’m all about making stuff visually appealing ~ not just for the kids either! It helps me to get excited about what we are doing!

Click on the thumbnail to download the pdf.

The workbox activity cards include a variety of subjects and activities from general subjects, outdoor actvities, and special trips. There are also ‘help’ cards {for when your child needs help from you} and minute cards for timed activities such as computer or reading. I also left a few squares blank in case you want to add some of your own stuff. Overall, there are a total of 32 picture cards, 24 minute cards, and 4 blank cards for you.

Enjoy them! If you have any problems downloading them, please let me know! Don’t forget the fun preschool workbox number cards for your little ones!

Photobucket

* The workbox number strips were removed per Sue Patrick’s request. *