

- Like
- Digg
- Del
- Tumblr
- VKontakte
- Buffer
- Love This
- Odnoklassniki
- Meneame
- Blogger
- Amazon
- Yahoo Mail
- Gmail
- AOL
- Newsvine
- HackerNews
- Evernote
- MySpace
- Mail.ru
- Viadeo
- Line
- Comments
- Yummly
- SMS
- Viber
- Telegram
- Subscribe
- Skype
- Facebook Messenger
- Kakao
- LiveJournal
- Yammer
- Edgar
- Fintel
- Mix
- Instapaper
- Copy Link
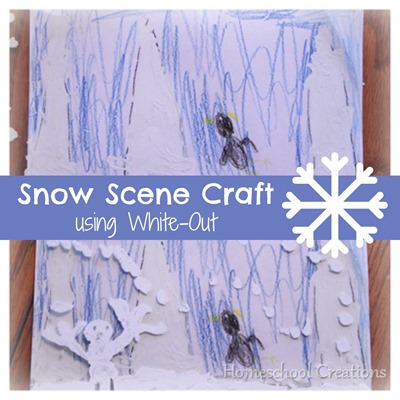
All of our kids had a great time working on this craft ~ especially Kaleb. Actually, Kaleb had way too much fun. By fun, I mean that Kaleb was painting his face with the white-out brush, painting the table, took a lick of white-out, and then dropped it on the floor. Now I’m trying to figure out how to get white-out off my wood floor.

BUT the end result was much better than the actual process, so maybe MY misfortune can help you all find a better process. :)
The project is actually two layers ~ a transparency sheet lays over top of a picture that your child has colored. Then you add ‘snow’ to the picture by painting on the transparency layer.

What You’ll Need:
- a jar of white-out
- white paper
- clear tape
- colored pencils
- transparency sheets
- scissors or paper cutter
How to Make Your Snow Scene:
Our pictures were a half sheet of paper {5 1/2” x 8 1/2”}.
- Cut your sheet of paper and overhead transparency sheet in half so that they are the above size. You can use a full sheet if you want to also.
- Tape the transparency sheet to the top of the paper on one of the sides, so that you can open it like a book.
- Have your child color a scene/picture on the paper using colored pencils or crayons.
- Flip the transparency over top of the picture and let your child add snow to the picture scene.
Here is how Zachary’s picture looked with and without his snow.


 The printables shared on this site are FREE of charge unless otherwise noted, and you are welcome to download them for your personal and/or classroom use only. However, free or purchased printables are NOT to be reproduced, hosted, sold, shared, or stored on any other website or electronic retrieval system (such as Scribd or Google docs). My printables are copyright protected and I appreciate your help in keeping them that way.
If you download and use some of my printables and then blog about them, please provide a link back to my blog and let me know - I'd love to see how you are using them! Please be sure to link to the blog post or web page and not directly to the file itself. Thank you!
The printables shared on this site are FREE of charge unless otherwise noted, and you are welcome to download them for your personal and/or classroom use only. However, free or purchased printables are NOT to be reproduced, hosted, sold, shared, or stored on any other website or electronic retrieval system (such as Scribd or Google docs). My printables are copyright protected and I appreciate your help in keeping them that way.
If you download and use some of my printables and then blog about them, please provide a link back to my blog and let me know - I'd love to see how you are using them! Please be sure to link to the blog post or web page and not directly to the file itself. Thank you!
Leave a Comment